
A crypter is software that can encrypt, obfuscate, and manipulate malware to make it harder to detect by security programs. The Zscaler ThreatLabZ research team recently spotted a common crypter being used in the recent Emotet, Qbot, and Dridex campaigns. This same crypter was observed in some of the Ursnif and BitPaymer campaigns as well. One of the reasons that Emotet and Dridex were able to survive for so long can be attributed to their ability to evade detection through the use of a volatile and polymorphic crypter, which wraps its original binary inside to complicate its detection and analysis.
Emotet is modular malware that primarily functions as a downloader or dropper for other banking Trojans. Emotet has been active for the past four years and it was one of the most prevalent malware families of 2018. In previous blogs, we analyzed Emotet and one of its delivery campaigns. Dridex is a banking Trojan that evolved from the Zeus Trojan family. Dridex remains active in the wild even after the FBI’s takedown attempt in 2015. Qbot can allow remote access to a victim’s system, steal information, and upload this stolen information to the attacker’s remote server. Recently, Emotet’s payload URLs were found to be serving Qbot and were using the same crypter we’re examining in this report.
This crypter provides multiple layers of protection on its core malware binary. In this research, we will describe the properties of crypted binaries that hold true across various mutations. These properties can be validated statically (without executing the binary) and used to write a decrypter. Below is a pictorial view of how Emotet’s core binary is digested inside the crypter’s layers of obfuscation and encryption wrappers.
0. Core binary
1. Code is obfuscated by shuffling instructions and substituting jump instruction
2. Obfuscated binary is encrypted and appended at the end of the custom loader binary
3. File alignment of custom loader binary is jumbled
4. Custom loader binary is encrypted
5. Final binary encapsulating scattered chunks of encrypted custom loader binary
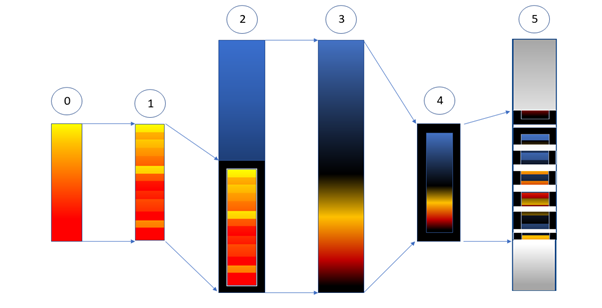
Image 1: Stages occur in crypter
Our goal is to reverse each of above stages to get the core malware binary. Furthermore, the core binary is supposed to be independently loadable/executable, and IOCs should be easily extractable. So, starting with stage 5, we will describe certain heuristics properties of the binary and using these properties we will decrypt the stage and continue to track down till stage 0. In our analysis, we found that these heuristics properties hold true across all mutations of the binaries.
Stage 5:
The 5th stage binary is the Emotet executable file that is downloaded via malicious links in MalSpams or malicious macros in MS Office documents. Our goal in stage 5 is to reach stage 4 to obtain the encrypted custom loader binary. As we can see in image 1, the binary at this stage contains scattered chunks of encrypted custom loader binary. We need to spot these chunks and assemble them in the proper order. Before discussing how we are going to do this, what follows are few examples of how these chunks can be spread across the binary. The chunks are outlined in red.


Image 2. Examples of chunk patterns
From the above examples, we can see that these chunks are not found in fixed locations, as their sizes are inconsistent, and the order of chunks varies, too. Therefore, our first challenge is to locate these chunks and arrange them in the proper order. The good news is that we know the crypter will also need to arrange the chunks and will do so by storing the chunk addresses and sizes in a table. Let’s call this table “Chunk Descriptor Table.” The bad news is that this table cannot be found in a predictable location in the binary nor is the structure of the table is constant across mutations of the binary. Below are some of the variants of this table structure. Chunk Descriptor Table is basically an array of the Chunk Descriptor Entry.
struct ChunkDescriptorEntry[n] ChunkDescriptorTable; // n == number of chunks

Image 3: Examples of Chunk Descriptor Table structures
In above structure, “chunkAddressDword” contains the virtual address of chunk. The size of chunk can be obtained by one of following operations on “firstDword” and “secondDword”. This operation is constant across all chunk descriptor entries.
- unsigned int chunkSize = firstDword + secondDword
- unsigned int chunkSize = firstDword ^ secondDword
- unsigned int chunkSize = secondDword - firstDword
Heuristics properties of Chunk Descriptor Table:
- 0
- offset(firstDword)
- offset(firstDword)
- offset(chunkAddressDword)
- entropy(chunk) > 5 out of 8.
- Chunks do not contain consecutive 4 zeros.
The following is the pseudo code for finding the chunk pattern. The function “FindChunkEntry” return offset of chunk and the distance of firstDword, chunkAddressDword from the beginning of the chunk offset. If the return value of three consecutive calls to function and length between three returned offsets are equal, then the whole array can be parsed to generate an associative array of chunk addresses and chunk sizes.
(offset1, m1, n1) = FindChunkEntry(filedata, fileSize)
(offset2, m2, n2) = FindChunkEntry(filedata + offset1, fileSize)
(offset3, m3, n3) = FindChunkEntry(filedata + offset2, fileSize)
If (offset2 - offset1) == (offset3 – offset2)
// found the FindChunkEntry array
FindChunkEntry(filedata, fileSize)
p = 0
while p > fileSize
firstDword = filedata[p]
q = p
while q
secondDword = filedata[p]
chunkSize = firstDword (+) secondDword
r = p - T
while r
chunkAddress = filedata[r]
if ValidateChunk(chunkAddress, chunkSize) == TRUE // Heuristics 5, 6
if p
x = q - p
y = r - q
z = ?
return (p, x, y)
elif p
x = r - p
y = q - r
z = ?
return (p, x, y)
elif r
x = p - r
y = q - p
z = ?
return (r, x, y)
r += 4
q += 4
p += 4
Now that we have an associative array of chunk address and chunk sizes, we can combine these chunks to get the encrypted custom loader binary. Here we are at stage 4.
Stage 4:
In our analysis, we observed that the custom loader binary (PE exe) is encrypted with a simple byte-to-byte addition in the loop with a key array. It is not necessary for the binary to be present at zero offset in this encrypted data. In stage four, our objective is to find the offset of the PE file in the encrypted data and the decryption key. First, we will find the decryption key, which can be brute forced over encrypted data to find the starting offset of the PE file. Decryption is present in the 5th stage binary but not at a predictable location. We will derive the decryption key from the encrypted data itself.
The heuristics property to be noted about the encrypted data is a pattern of a repeating consecutive sequence of bytes. This pattern of the repeating sequence is induced by nature of the encryption and the properties of the PE file. In the encrypted data, this pattern will appear at locations that should have filled with zeros when non-encrypted. The following are possible locations.
- At beginning of the encrypted data because the PE file will not necessarily begin at zero offset.
- Caves between two sections and between the PE header and the first section.
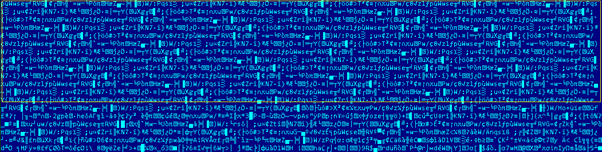
Image 4: Encrypted data showing an example of the repeating sequence of bytes
Image 5: Decrypted data showing the appearance of the corresponding PE file
The repeating sequence is our key and the length of the sequence is the key length. The next thing we need to do is to find the beginning of the key in this consecutively repeating sequence and offset of the PE file. This can be done by simply applying the inverse of the encryption on this sequence and the encrypted data from its starting point while checking against the MZ header.
Here is the pseudo code:
FindPeFileAndKeyStart (keySequence, keySequenceLen, encryptedData, encryptedDataLen)
k = 0
while (k
i = 0
while (i
if ( // inverse encryption
encryptedData[i + 0] - keySequence[k + 0] == 0x4D &&
encryptedData[i + 1] - keySequence[k + 2] == 0x5A &&
encryptedData[i + 3] = keySequence[k + 3]
)
peFileOffset = i
keyStart = k
return (peFileOffset, keyStart)
Now that we have the PE file offset and key, we can decrypt the data with byte-to-byte subtraction with the key in the loop. At this point, we have the custom loader binary, but this custom loader binary has a strange file alignment that we need to normalize. Thus, we are at stage 3.
But before proceeding with stage 3, here are few more methods that could also have given us the key in this stage.
- Search for instruction in the binary of the 5th stage, which accesses the key. Here are the examples that we found in our analysis.
- 8A 0C 1D FF 31 40 00 MOV CL, BYTE PTR DS : [EBX + 4031FF]
- 2A 0C 1D 30 42 40 00 SUB CL, BYTE PTR DS:[EBX+404230]
- 8D 84 01 0B 32 36 01 LEA EAX,DWORD PTR DS:[ECX+EAX+136320B]
- 8B 1D E4 DD 46 00 MOV EBX,DWORD PTR DS : [46DDE4]
- 8D 0D 81 A1 3D 01 LEA ECX,DWORD PTR DS:[13DA181]
- 8A 86 77 41 E8 00 MOV AL, BYTE PTR DS : [ESI + E84177]
- 8A 98 77 51 C0 00 MOV BL, BYTE PTR DS : [EAX + C05177]
- A1 3C FB 46 00 MOV EAX,DWORD PTR DS : [46FB3C]
DWORD points to a key array; of course it will give a false address. So, we need to validate the key by applying it on encrypted data for each such instruction.
2. In most cases, the key is found just above the pdb path.
Stage 3:
At this stage, we have a custom loader binary whose file alignment is messed up. We are going to assign a new file alignment to this PE image which is 0x200. Changing the file alignment is trivial, only requiring us to carefully shift sections of the new file alignment based calculated addresses and updating section addresses and sizes in the Section Header table.
Here is the pseudo code.
dwNewFileAllignment = 0x200
dwCurrentRawAddress = GetAllignedDwrod(PEHeader.OptionalHeader.SizeOfHeaders, dwNewFileAllignment);
while (i
NewSecionHeaders[i].PointerToRawData = dwCurrentRawAddress;
NewSecionHeaders[i].SizeOfRawData = GetAllignedDwrod(OldSecionHeaders[i].SizeOfRawData, dwNewFileAllignment);
Memcpy(pbyNewFileBuffer + dwCurrentRawAddress,
pbyOldFileData + OldSecionHeaders[i].PointerToRawData,
OldSecionHeaders[i].SizeOfRawData);
dwCurrentRawAddress += GetAllignedDwrod(OldSecionHeaders[i].SizeOfRawData, dwNewFileAllignment);
dwCurrentRawAddress = GetAllignedDwrod(dwCurrentRawAddress, dwNewFileAllignment);
i = i + 1
This is it, we have plain and loadable binary of custom loader. That moved us to stage 2.
Stage 2:
In the appended data of the custom loader, there is encrypted data which is nothing but an obfuscated version of the core malware binary. The encryption method is the same as that of stage 4. All we need to do here is calculate the offset of the appended data and apply the decryption technique mentioned in the 4th stage. As a result, we got the core PE file, but it needed some fixes in the code as some instructions were missing in the binary.
Stage 1:
At this stage, we have a PE file which is somewhat incomplete because the loader binary had already eaten up some instructions from the code section. These eaten instructions will be put in memory and a JUMP instruction will be inserted in the code of the core binary, which points to the corresponding eaten instructions. Then the control is passed over to the core binary.
The below image is an example of how this obfuscation appears.
Image 6: Obfuscated code with JUMP instruction
The final objective is to de-obfuscate the code of the core binary. That means we need to return the eaten instructions back to their actual location and remove the JUMPs. At this point, the above code will appear as follows.
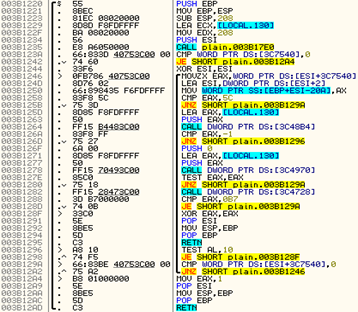
Image 7: De-obfuscated code
It is the loader’s responsibility to smoothly execute the core malware even after instructions are placed in different locations. The loader needs to calculate the JUMP address of the moved instructions and put the JUMP instructions in place of those instructions. For this, the moved instructions and their meta information are stored in the loader’s binary itself. In our analysis, we found that the table containing this information was present in the “.rdata” section.
struct DeobfuscationTable
{
unsigned int dwOrgInstrVAdddress; // Address of eaten instruction in loader’s binary
unsigned int dwPatchRVAddress; // Offset where Jump need to insert
unsigned int dwOrgInstrLength; // length of moved instructions in bytes
};
Once we get the de-obfuscation table, we just need to read “dwOrgInstrLength” bytes from the virtual address “dwOrgInstrVAdddress” loader’s binary and write them to a relative virtual address “dwPatchRVAddress” in the core malware binary.
Here is the pseudo code for this.
while (pDeObfuscationTable-> dwOrgInstrVAdddress != 0x00)
{
patchOffset = GetFileOffsetFromRVA(
pCorePEHeader,
pCoreSectionHeaders,
pDeObfuscationTable-> dwPatchRVAddress);
orgInsOffset = GetFileOffsetFromRVA(
pLoaderPEHeader,
pLoaderSectionHeaders,
pDeObfuscationTable-> dwOrgInstrVAdddress - pLoaderPEHeader-OptionalHeader.ImageBase);
memcpy (
pbyCoreFileData + dwPatchOffset,
pbyLoaderFileData + orgInstrOffset,
pDeObfuscationTable->dwOrgInstrLength);
pDeObfuscationTable += 1;
}
At this stage, we would have obtained the plain, independently executable core Emotet binary, which can be decompiled by IDA or can be bin-diffed with other binaries extracted by this decoder.


